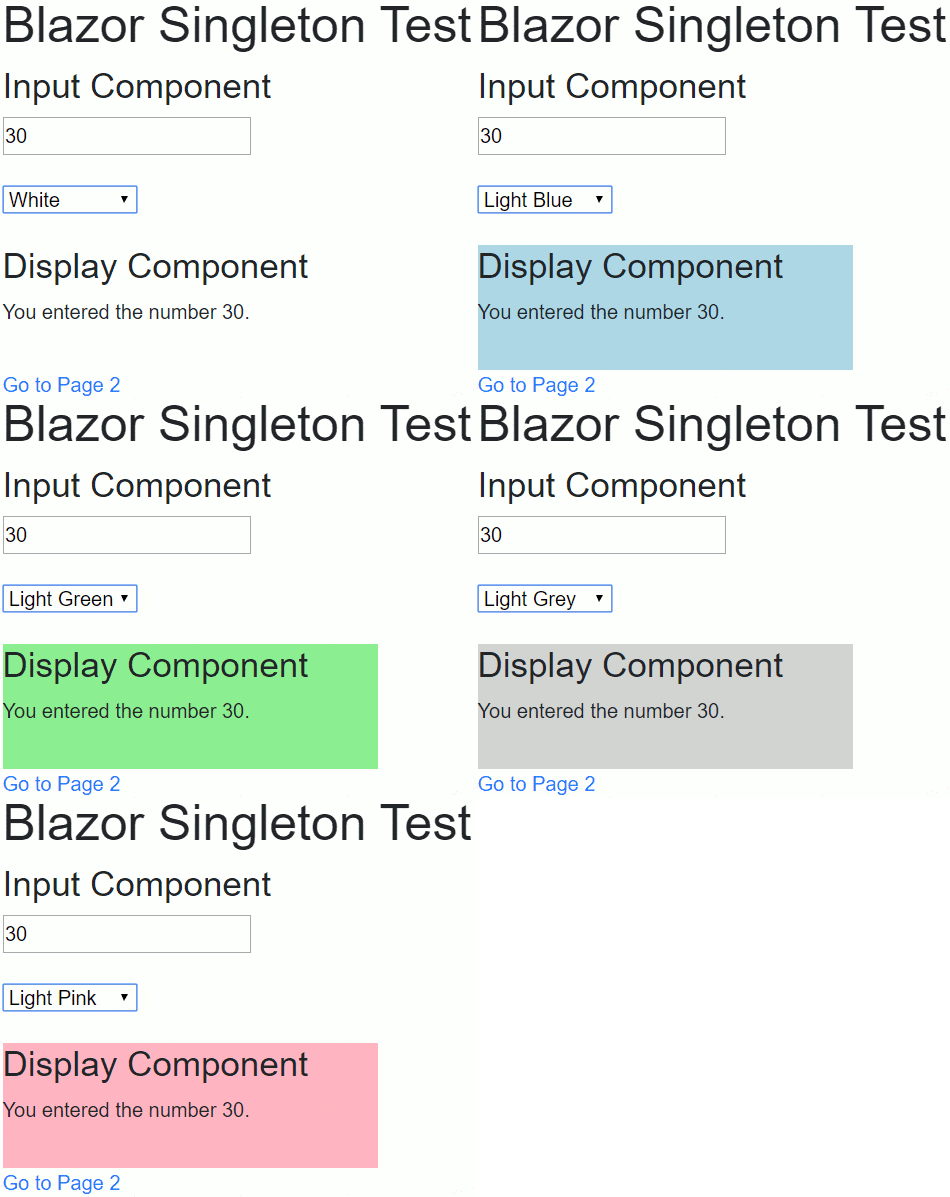
The best way to pass data between Blazor pages is by registering a singleton service and injecting it as a dependency onto the pages or components that need it. In this tutorial, you will create a C# class, register it as a service in your Blazor app, inject an instance of the service onto your pages, and use the service to share data across Blazor components.
This technique you learn in this tutorial will allow you to pass parameters from one Blazor component to another, even if those components are on different pages. This is not only important for keeping your C# code clean, but it is also ensures the end user has a consistent experience across all pages of your site. Moreover, using a service class enables you to you to pass data in a way that does not require the use of routing parameters.
Initial Setup
Start by creating a new client-side Blazor WebAssembly project called AppDataService. Next, add a new folder to your project called Services. In the Services folder, add a new C# class item called AppData.cs. Next, in the Pages folder, create a new Razor Component called Page2.razor. You will come back to these items soon.
Create Service Class
For this tutorial, you will recreate the functionality of the previous lesson, but without using routing parameters. As a reminder, the objective is to create a webapp wherein you can set the value of a property on one page and another page will be aware of the value. This is not the parent-child component relationship you learned about before. Rather, this lesson will teach you a echnique that will allow you to share common data between sibling components.
Open AppData.cs and create a public property within the AppData class.
namespace AppDataService.Services
{
    public class AppData
    {
        public int Age { get; set; }
    }
}
For now, that’s it! The class consists of a single public int property with default get and set accessors. You will learn a way to extend the functionality of this class later in this tutorial, but for now this will do.
Register as Service
Next, you must register the class as a service with the application’s service container. Open Startup.cs and locate the ConfigureServices method.
public void ConfigureServices(IServiceCollection services)
{
    services.AddSingleton<Services.AppData>();
}
Here, you have added the AppData class (from the Services folder, hence Services.AppData) with a Singleton lifetime, using the AddSingleton<>() method of the IServiceCollection interface. Singleton is perfect for a client-side Blazor app, but if you are working with server-side Blazor, you will want to register as a Scoped service so each different user receives his/her own instance of the service for the duration of their session.
services.AddScoped<Services.AppData>();
A Singleton allows the same instance of a service class to be shared across components. This is good, because you want to be sure all your pages receive the same instance of the AppData service class. This will ensure that the data (namely Age, in this example) is correctly shared between pages throughout the lifetime of the application.
You have successfully created a service class and registered it as a singleton service. Now, let’s use it.
Set up First Page
Remember, in this tutorial you want to pass data between Blazor pages. The Razor component Index.razor will be the first page. Start by injecting the singleton instance of the AppData service into the page.
@page "/"
@inject Services.AppData AppData
Again, the AppData class is located in the Services folder, hence Services.AppData. You could set the instance name to anything. In the above line, you assigned it the name AppData (the second AppData in the line). This is the name by which you will refer to the service instance in the scope of the Index.razor component.
Next, create a simple form and bind the value of the input element to the Age property in the AppData instance. Then add a link that will navigate the user to a different page.
@page "/"
@inject Services.AppData AppData

<h1>First Page</h1>
<input type="number" @bind="AppData.Age" />
<br>
<a href="/page2">Go to Page 2</a>
Notice, there are no routing parameters here. You simply set the value of AppData.Age, and hopefully Page2 will be able to see the change. Let’s find out!
Configure Second Page
Now open the Page2.razor file you created earlier. Because you also need to access the singleton instance of the AppData service on this page, you will also need to inject it into this component as a dependency.
@page "/page2"
@inject Services.AppData AppData
Now, let’s create a page to test whether the data was successfully shared across Blazor components.
@page "/page2"
@inject Services.AppData AppData

<h1>Second Page</h1>
<p>You entered the number @AppData.Age.</p>
That’s all! Build and run the application, enter a value in the input field on Page1, and click the link to navigate to Page2. The number you entered will appear on the second page. You have successfully shared data between pages in Blazor without using route parameters!
Level Up – Add OnChange Event to Service
The above technique works when the same component modifying the data is also displaying it, because the bind event handles the UI refresh. It also works when one component modifies the value and the other component only needs to read the value when the component initializes. In the example above, notice that Page2 only needs to retrieve the value of the AppData.Age one time on page load. It does not have to worry about Index.razor modifying the file again while Page2.razor is loaded. The UI will never be changed by a different component. Of course, if there were some input element on Page2 for changing the the value of AppData.Age, that would not be a problem. The UI would be refreshed when the bind:event is raised just as it would for any other bound variable.
The special case, then, is if you need to pass data between two components which are already loaded on the same page. In this case, you will need to add an OnChange event to the service class and add an event handler to the component in order to tell the UI to refresh every time the service class property is changed.
Add OnChange Event to Service Class
Use the following example as a guide for extending the functionality of your service class by adding an OnChange event to the AppData.cs file.
using System;
namespace AppDataService.Services
{
    public class AppData
    {
        private int _number;
        public int Number
        {
            get
            {
                return _number;
            }
            set
            {
                _number = value;
                NotifyDataChanged();
            }
        }

        private string _color;
        public string Color
        {
            get
            {
                return _color;
            }
            set
            {
                _color = value;
                NotifyDataChanged();
            }
        }

        public event Action OnChange;

        private void NotifyDataChanged() => OnChange?.Invoke();
    }
}
This time, you need to set custom get and set accessors to trigger the NotifyDataChanged() method when a new value is set. The NotifyDataChanged() method’s sole purpose is to trigger the OnChange event, which can be handled by your Razor components. In this example, two properties are now defined, Number and Color, each of which also has a corresponding private member variable explicitly defined, _number and _color. These are referred to as backing-fields.
Register Service Class
You don’t need to do anything if you have already registered your service in Startup.cs. Otherwise, be sure the following line is included in the ConfigureServices method.
public void ConfigureServices(IServiceCollection services)
{
    services.AddSingleton<Services.AppData>();
}
Create Two Blazor Components
To demonstrate the passing of values between two Blazor components on the same page, I have created two Razor Component items, InputComponent.razor and DisplayComponent.razor. These files are located them in a Components folder in my project.
InputComponent.razor
@inject Services.AppData AppData
<h3>Input Component</h3>
<input type="number" @bind="AppData.Number" />
<br /><br />
<select @bind="AppData.Color">
    <option value="#add8e6">Light Blue</option>
    <option value="#90ee90">Light Green</option>
    <option value="#d3d3d3">Light Grey</option>
    <option value="#ffb6c1">Light Pink</option>
    <option value="#fff">White</option>
</select>
<br /><br />
DisplayComponent.razor
@inject Services.AppData AppData
<div style="width:300px; height:100px; background-color:@AppData.Color">
    <h3>Display Component</h3>
    <p>You entered the number @AppData.Number.</p>
</div>

@code {
    protected override void OnInitialized()
    {
        AppData.OnChange += StateHasChanged;
    }
}
The InputComponent provides an input field to capture a number entered by the user. This number is binded to the AppData.Number property of the service class. InputComponent also provides a select element with color options. The selected color is bound to the AppData.Color property. Notice the first line of the component actually performs the dependency injection.
The DisplayComponent displays a 320px by 240px box whose background color corresponds to the color saved in AppData.Color. The important thing to note in this file is that the OnInitialized() method is overridden in order to assign Blazor’s StateHasChanged() method as an event handler to be triggered when the the service class’s OnChange event is raised. The StateHasChanged() method is used by Blazor to manually trigger a refresh of the UI. Because AppData is not being changed by DisplayComponent itself, the UI refresh must be manually triggered. This is the reason you added the OnChangeevent to the AppDataservice class!
Update Index.razor and Page2.razor
To test that this configuration indeed allows for the handing off of data between Blazor components, render the two components you just created on your Index.razor file.
@page "/"
@using AppDataService.Components
@inject Services.AppData AppData

<h1>Blazor Singleton Test</h1>
<InputComponent />
<DisplayComponent />
<a href="/page2">Go to Page 2</a>

@code {
    protected override void OnInitialized()
    {
        AppData.OnChange += MyEventHandler;
    }

    private void MyEventHandler()
    {
        Console.WriteLine("AppData changed.");
    }
}
I also went ahead and added a link to navigate to Page2 , just to make sure the changes still persist across pages. It’s good to be thorough. I also wanted to demonstrate that you can attach any event handler you want to the AppData.OnChange event, so I created and attached a MyEventHandler method which simply writes a line to the browser’s JavaScript console. This handler should be triggered when the OnChange event is raised.
Next, update Page2.razor. You will need to inject the service dependency and listen for the OnChange event, just as you did for the other components.
@page "/page2"
@inject Services.AppData AppData

<h1>Second Page</h1>
<div style="width:640px; height:480px; background-color:@AppData.Color">
    <p>You entered the number @AppData.Number.</p>
</div>

@code {
    protected override void OnInitialized()
    {
        AppData.OnChange += StateHasChanged;
    }
}
The Final Product
Finally, you are ready to test your new app. If the data is correctly shared between Blazor components, the color and contents of the div generated by the <DisplayComponent> component on Index should change as the input and select elements are modified. The div on Page2 should also reflect the most recent value of the AppData properties when you navigate there.

The source code for this project is available on GitHub.
Don't stop learning!
There is so much to discover about C#. That's why I am making my favorite tips and tricks available for free. Enter your email address below to become a better .NET developer.
Did you know?

Our beautiful, multi-column C# reference guides contain more than 150 tips and examples to make it even easier to write better code.
Get your cheat sheets