In this tutorial, we will discover the basic workflow as you write your first C# program. We will explore such things as how to create a new project, where to type your C# code, and how to test and debug your application. I am using the free community edition of Visual Studio. If you do not already have Visual Studio installed and configured for C#, you can follow my Installing Visual Studio tutorial to get caught up.
Creating a C# New Project
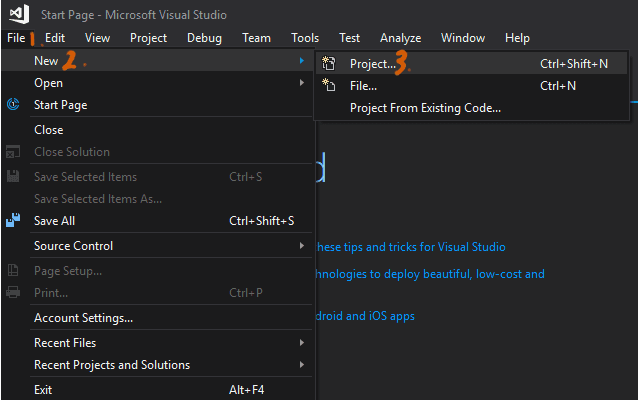
First, we will create a new project by going to File > New > Project...
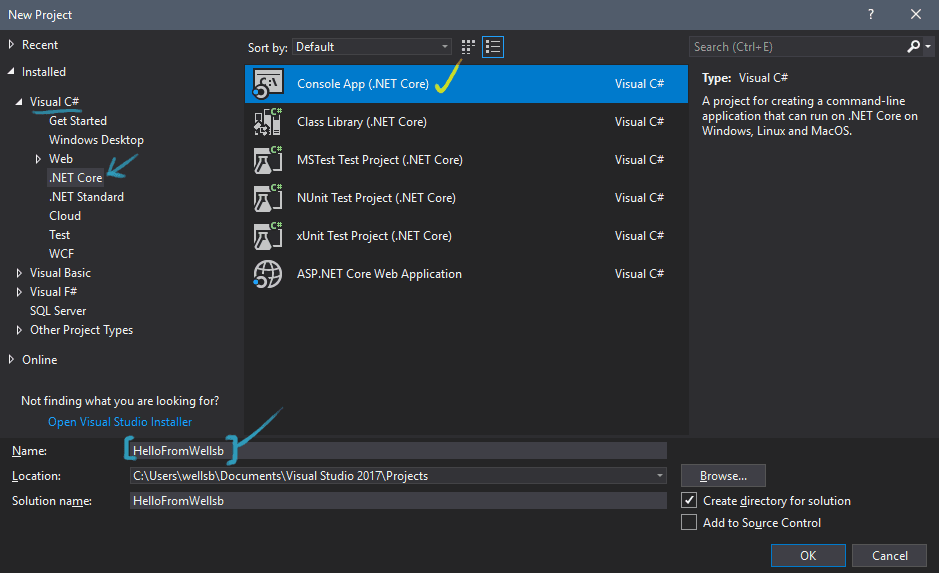
Next, under your installed templates, navigate to Visual C# > .NET Core and select Console App (.NET Core). Name the project HelloFromWellsb. Pay attention to the naming convention I am using when I name my C# projects - I use capital letters for each word with no spaces in between. This is a common naming convention for C#, so I encourage you to adopt it.
When you click OK, you will see your Visual Studio workspace. Take some time to get familiar with the interface. On the right side, you will see the Solution Explorer. This is where you will find all the files and resources for your current project. You should see Program.CS in this list. This is the file that should already be open in the main code editor window. In the code editor, you will see some boilerplate code already generated.
using System;

namespace HelloFromWellsb
{
    class Program
    {
        static void Main(string[] args)
        {
            Console.WriteLine("Hello World!");
        }
    }
}
Common C# Build Errors
As you may have guessed, this simple application will print "Hello World!" to the console. Before we run the program, we should observe some things about C# code syntax. I have highlighted line 9 above. This line is a C# instruction. Notice that this line ends in a semi-colon ( ; ). A properly formed instruction in C# will always end in a semi-colon. If you try to build your program and forget the semi-colon, your build will fail and you will be presented with an error showing you where a semicolon was expected.
Second, you will notice that class names and method names in C# are case sensitive. The word Console in line 9 is a C# class, and WriteLine is a method of that class. We will discuss the difference between classes and methods in the next lesson. At this point, it is enough to observe that if you were to type console.WriteLine("Hello World!"); with a lowercase letter 'c', you would receive an error. Similarly, you would receive an error if you were to type Console.writeline("Hello World!"); where the method name is written with lowercase letters.
Running your C# Program
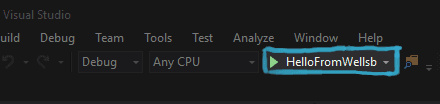
Now, go ahead and run the program by clicking the debug button in the toolbar. You can also find this button in the menus under Debug > Start Debugging. Because this is a feature you will take advantage of quite often, it is a good idea to get used to using the keyboard shortcut. You can start the debugger and run your program at any time by simply pressing F5 on your keyboard. If you want to just run the program quickly without attaching the debugger, you can use the keyboard shortcut Ctrl+F5.
When you start the debugger, your code will open a terminal window, display the text "Hello World!" and immediately close the window. This isn't particularly exciting, because the window probably closed before you even got to see what was printed to the screen. Let's make a few changes.
First, let's change line 9 in our code to a more personalized message. Then we will add another line beneath it to force our program to wait for user input. This will prevent the terminal window from immediately closing after our code is executed. Our new code is as follows:
using System;

namespace HelloFromWellsb
{
    class Program
    {
        static void Main(string[] args)
        {
            Console.WriteLine("Hello from wellsb.com!");
            Console.ReadLine();
        }
    }
}
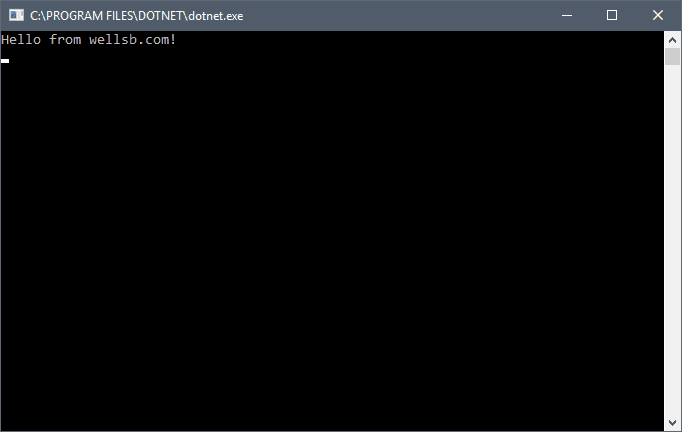
Now, when you press F5 to run your program, you will see the words "Hello from wellsb.com!" in your console window. This is generated by line 9 in your code. There will be a blinking cursor on the next line. This is from line 10 in your code, where the cursor indicates that your program is waiting to read your input. For now, we aren't doing anything with the data you input, so when you press the Enter key, the program will reach the end of the code and the console window will close.
The Bottom Line
Congratulations! You have just written and launched your first C# program. There may still be a number of concepts in the example that are unfamiliar to you - there are a lot of lines in our code, but we only really studied one of them. Don't worry! In the coming tutorials will try to answer some of the most common questions and expose you to more of C# and the .NET Core framework. In the next lesson, we will learn about common C# terms likes classes and methods.
Have any questions about this example? Let me know in the comments!
Don't stop learning!
There is so much to discover about C#. That's why I am making my favorite tips and tricks available for free. Enter your email address below to become a better .NET developer.
Did you know?

Our beautiful, multi-column C# reference guides contain more than 150 tips and examples to make it even easier to write better code.
Get your cheat sheets