In the previous tutorial, you were introduced to the world of chatbot creation using the Microsoft Bot Framework. The example was fairly trivial, as the bot simply echoed the input of the user. In this tutorial, you will take your bot to the next level by creating something useful - a bot that will translate language.
Getting Started
For this tutorial, you will need an active Azure subscription, as we will be relying on the Microsoft Translator service. For helping signing up for the Microsoft Translator service in Azure, follow the MS Docs guide. Don't worry, you can use the free tier.
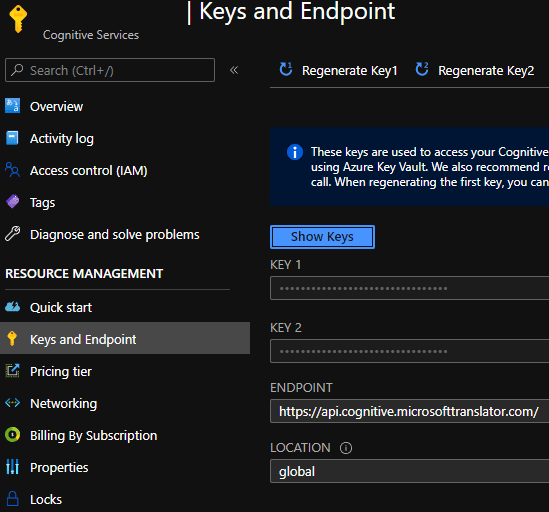
Once your Cognitive Services Text Translation endpoint has been created, navigate to it in the Azure Portal and locate your secret keys. You will need these later.
Now in Visual Studio, create a new Echo Bot project like you did in the the previous tutorial, except this time we will build off of the scaffolded project. Rename the EchoBot.cs class under the Bots folder and call it TranslateBot.cs.
public class TranslateBot : ActivityHandler
{
    protected override async Task OnMessageActivityAsync(ITurnContext<IMessageActivity> turnContext, CancellationToken cancellationToken)
    {

    }

    protected override async Task OnMembersAddedAsync(IList<ChannelAccount> membersAdded, ITurnContext<IConversationUpdateActivity> turnContext, CancellationToken cancellationToken)
    {

    }
Now, in Startup.cs, be sure your project is configured to launch the TranslateBot instead of the previously configured EchoBot.
services.AddTransient<IBot, TranslateBot>();
Configure your Translate Bot
For this tutorial, we will use Visual Studio's Secret Manager in our development environment. This will allow you to easily migration to a production environment using something like Azure Key Vault. Start by binding the required Azure Translator configuration options to a POCO class. I created a Models/Config directory and added a TranslatorConfig class there.
public class TranslatorConfig
{
    public string Key { get; set; }
    public string Endpoint { get; set; }
}
Your secrets.json will look something like the following.
{
  "Translator": {
    "Key": "YOUR_KEY_HERE",
    "Endpoint": "https://api.cognitive.microsofttranslator.com/"
  }
}
Don't forget to add the configuration elements to your IOptions collection so you will be able to inject it into your bot class.
services.AddOptions();
services.Configure<TranslatorConfig>(Configuration.GetSection("Translator"));
Back in TranslateBot.cs, inject an instance of the options service into your bot handler object.
public class TranslateBot : ActivityHandler
{
    private readonly IOptions<TranslatorConfig> _options;

    public TranslateBot(IOptions<TranslatorConfig> options)
    {
        _options = options;
    }

    ...

}
Set up JSON Response Classes
Now that you have everything set up, you are ready to begin using the Azure Cognitive Services Translator endpoint to begin processing messages
Start by defining some model classes to hold the source text and translated result text in accordance with the expected response body from the Translator API. This will be used for response object serialization. First up is the translation result class.
public class TranslationResult
{
    public DetectedLanguage detectedLanguage { get; set; }
    public TextResult sourceText { get; set; }
    public Translation[] translations { get; set; }
}

public class DetectedLanguage
{
    public string language { get; set; }
    public float score { get; set; }
}

public class TextResult
{
    public string text { get; set; }
    public string script { get; set; }
}

public class Translation
{
    public string text { get; set; }
    public TextResult transliteration { get; set; }
    public string to { get; set; }
    public Alignment alignment { get; set; }
    public SentenceLength sentLen { get; set; }
}

public class Alignment
{
    public string proj { get; set; }
}

public class SentenceLength
{
    public int[] srcSentLen { get; set; }
    public int[] transSentLen { get; set; }
}
Next, the detect language result class.
public class DetectLanguageResult
{
    public string language { get; set; }
    public float score { get; set; }
    public bool isTranslationSupported { get; set; }
    public bool isTransliterationSupported { get; set; }
    public AltTranslations[] alternatives { get; set; }
}
public class AltTranslations
{
    public string language { get; set; }
    public float score { get; set; }
    public bool isTranslationSupported { get; set; }
    public bool isTransliterationSupported { get; set; }
}
If you are using Newtonsoft for JSON serialization, you can use Pascal casing for your variable names. Because I am using System.Text.Json instead, I must use camel casing so my variable names match the expected casing of the response body.
Write Translation Methods
For demonstration purposes, I will write a simple English-French translator bot that will detect the language of a given input and translate the string into the other language. The bot will automatically return the appropriate result after the user inputs data, so I will include the code in the OnMessageActivityAsync method.
protected override async Task OnMessageActivityAsync(ITurnContext<IMessageActivity> turnContext, CancellationToken cancellationToken)
{
    string detectRoute = "/detect?api-version=3.0";
    string translateRoute = null;
    string replyText = null;
    var detectResult = await DetectLanguageAsync(_options.Value.Key, _options.Value.Endpoint, detectRoute, turnContext.Activity.Text);

    switch (detectResult.language)
    {
        case "en":
            translateRoute = "/translate?api-version=3.0&to=fr";
            break;
        case "fr":
            translateRoute = "/translate?api-version=3.0&to=en";
            break;
        default:
            translateRoute = null;
            break;
    }

    if (!string.IsNullOrEmpty(translateRoute))
    {
        var translateResult = await TranslateTextAsync(_options.Value.Key, _options.Value.Endpoint, translateRoute, turnContext.Activity.Text);
        replyText = translateResult.translations.FirstOrDefault().text;
    }
    else
    {
        replyText = "Uh-oh... I only support French and English translations.";
    }

    await turnContext.SendActivityAsync(MessageFactory.Text(replyText, replyText), cancellationToken);
}
You will notice two methods that have not yet been defined, DetectLanguageAsync and TranslateTextAsync.
DetectLanguageAsync is used to determine the language of a given string.
private async Task<DetectLanguageResult> DetectLanguageAsync(string subscriptionKey, string endpoint, string route, string inputText)
{
    object[] body = new object[] { new { Text = inputText } };
    var requestBody = JsonSerializer.Serialize(body);

    using (var client = new HttpClient())
    using (var request = new HttpRequestMessage())
    {
        // Build the request.
        request.Method = HttpMethod.Post;
        request.RequestUri = new Uri(endpoint + route);
        request.Content = new StringContent(requestBody, Encoding.UTF8, "application/json");
        request.Headers.Add("Ocp-Apim-Subscription-Key", subscriptionKey);

        // Send the request and get response.
        HttpResponseMessage response = await client.SendAsync(request).ConfigureAwait(false);

        // Read response as a stream.
        var result = await response.Content.ReadAsStreamAsync();
        return (await JsonSerializer.DeserializeAsync<DetectLanguageResult[]>(result)).FirstOrDefault();
    }
}
The method defined above is not a fail-proof approach, because a user could enter a single word like tester, which could be either French or English. In this case, the bot will simply choose one. This is why most translation apps require you to select the From and To languages.
The TranslateTextAsync method is very similar, except it will have been passed a different route, so it will return a different object.
private async Task<TranslationResult> TranslateTextAsync(string subscriptionKey, string endpoint, string route, string inputText)
{
    object[] body = new object[] { new { Text = inputText } };
    var requestBody = JsonSerializer.Serialize(body);

    using (var client = new HttpClient())
    using (var request = new HttpRequestMessage())
    {
        // Build the request.
        request.Method = HttpMethod.Post;
        request.RequestUri = new Uri(endpoint + route);
        request.Content = new StringContent(requestBody, Encoding.UTF8, "application/json");
        request.Headers.Add("Ocp-Apim-Subscription-Key", subscriptionKey);

        // Send the request and get response.
        HttpResponseMessage response = await client.SendAsync(request).ConfigureAwait(false);

        // Read response as a stream.
        var result = await response.Content.ReadAsStreamAsync();
        return (await JsonSerializer.DeserializeAsync<TranslationResult[]>(result)).FirstOrDefault();
    }
}
The Final Product
Congratulation, you have successfully created a language translation bot!
This particular bot will return an error message if the entered text is neither French nor English. As an exercise, try configuring your bot to return both the English and French translations when a third language is entered.
As you can see, it is quite easy to create bots with real functionality using the Bot Framework. This bot integrates with a Translation API, but you could use the same principles to create a bot to do any number of things. Source code for this project is available on GitHub. Please study the code and supporting documentation. As always, feel free to ask any questions you have.
Don't stop learning!
There is so much to discover about C#. That's why I am making my favorite tips and tricks available for free. Enter your email address below to become a better .NET developer.
Did you know?

Our beautiful, multi-column C# reference guides contain more than 150 tips and examples to make it even easier to write better code.
Get your cheat sheets