Collections in C# are similar to arrays, but with added benefits. Perhaps most importantly, they enable the developer to take advantage of rich sorting, filtering, and aggregation features available in the .NET Core framework through LINQ queries.
In this tutorial, you will learn about the collection type known as a generic list, List<T>, including how to initialize a list in C#.
How to Initialize a List in C#
A generic list, List<T>, is a strongly typed C# collection. In other words, you, the developer, must make it specific by defining the data type that can be part of the collection. You will do this by replacing the <T> with the <Type> of data that is allowed to be stored in the collection.
Suppose, for example, you want to write an application to be able to document and manage all the books you have in a library. Start by creating a simple Book class definition that can be used for each instance of Book in your library. If you are not sure how to overload C# class constructors, feel free to read through that lesson.
class Book
{
    public string Title { get; set; }
    public string Author { get; set; }
    public int PubDate { get; set; }

    public Book(string title, string author, int pubDate)
    {
        Title = title;
        Author = author;
        PubDate = pubDate;
    }
}
Next, you will store each instance of Book into a List<Book> collection. The List<Book> collection will, thus, represent the whole library. It will be a collection of all the instances of the Book class. To use collections, start by adding the appropriate namespace reference to the project.
using System.Collections.Generic;
Next, you will declare and initialize the new list of books. Use the following collection initializer technique to add instances of Book to the List.
List<Book> bookList = new List<Book>()
{
    new Book("Les Miserables", "Victor Hugo", 1862),
    new Book("L'Etranger", "Albert Camus", 1942),
    new Book("Madame Bovary", "Gustave Flaubert", 1857)
};
On Line 10, you are declaring a new generic collection of type List which contains elements of type Book. This collection, List<Book>, is named bookList.
Observe that the subsequent lines, Lines 12-14, comprise a code block surrounded by curly braces {}. The instances of the Book class declared within these braces will automatically be added to bookList. This notation is known as the collection initializer notation. In this example, three instances of Book have been initialized according to the previously-defined class constructor.
Adding Items to a Collection
Previously, you learned about arrays, which allow you to store groups of related data in a single variable. Recall that to initialize an array, you must specify, either explicitly or implicitly, the number of elements in the array. This is no longer necessary with collections.
With collections, it is easy to add elements to an array and remove elements from an array. Suppose you wish to add a fourth book to your list of books. You would simply declare a new instance of Book with the appropriate Title, Author, and Publication Date. Then, you would add it to the collection using the .Add() method, as demonstrated on Line 18, below.
Book book4 = new Book("Le Comte de Monte-Cristo", "Alexandre Dumas", 1844);
bookList.Add(book4);
Similar methods are provided for removing specific instances from a collection .Remove() and for removing the instance located at a certain index position within the collection .RemoveAt().
Working with Collections
You can loop through the items in your list in the same way you would for an array. Lines 20-23 of the complete example below show how to do this using a foreach loop.
using System;
using System.Collections.Generic;

namespace Collections
{
    class Program
    {
        static void Main(string[] args)
        {
            List<Book> bookList = new List<Book>()
            {
                new Book("Les Miserables", "Victor Hugo", 1862),
                new Book("L'Etranger", "Albert Camus", 1942),
                new Book("Madame Bovary", "Gustave Flaubert", 1857)
            };

            Book book4 = new Book("Le Comte de Monte-Cristo", "Alexandre Dumas", 1844);
            bookList.Add(book4);

            foreach (Book book in bookList)
            {
                Console.WriteLine($"{book.Title} by {book.Author}");
            }

            Console.ReadLine();
        }
    }

    class Book
    {
        public string Title { get; set; }
        public string Author { get; set; }
        public int PubDate { get; set; }

        public Book(string title, string author, int pubDate)
        {
            Title = title;
            Author = author;
            PubDate = pubDate;
        }
    }
}
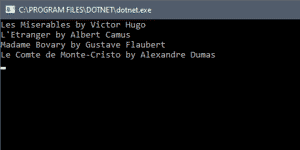
In this example, you have created and initialized a List of objects. You added items to the list using the two techniques learned in this tutorial. Finally, you used a foreach loop in order to loop through each element of the list and print the Title and Author information to the console. When you run this program, the result should look similar to the screenshot below.

A Note about LINQ
While the foreach loop is a useful way to loop through all the items in a collection, you will often find yourself needing to sort and filter your collection before working with or displaying its contents. In subsequent tutorials, you will learn about a powerful tool, known as LINQ (Language Integrated Query) for sorting and filtering collections. This will be the preferred method for working with C# collections, so stay tuned!
Did you know?

Our beautiful, multi-column C# reference guides contain more than 150 tips and examples to make it even easier to write better code.
Get your cheat sheets