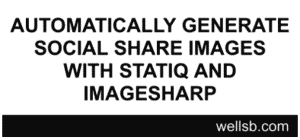
One of the most beautiful things about static site generators is the ability to automate your workflow as part of the build process. In this tutorial, you will learn how I pair the Statiq site generator with ImageSharp to automatically generate featured images and social share images for this site.
Getting Started
If you are a C# developer interested in launching a statically generated blog or website, the Statiq.Web toolkit is a great option because it is built with .NET. I have created and made available a boilerplate template to help you get started.
To get started with Statiq, install the Statiq.Web Nuget package.
Install-Package Statiq.Web -Version 1.0.0-beta.33
To create graphics programatically, I use the ImageSharp library.
Install-Package SixLabors.ImageSharp
Install-Package SixLabors.ImageSharp.Drawing -Version 1.0.0-beta13
Add Statiq Pipeline
Adding modules and pipelines in Statiq is as simple as inheriting from the appropriate base class. To add a Statiq pipeline to automatically generate social share images as part of the build process, create a new folder called Pipelines and add a class file called SocialShare.cs. This class should inherit from the Pipeline base class.
namespace StatiqBlog.Pipelines
{
    public class SocialImages : Pipeline
    {
        public SocialImages()
        {

        }
    }
}
A Statiq.Web pipeline may depend on the results of other pipelines that are triggered as part of the build process. In this case, we want to generate an image for every post in our blog, so this pipeline will depend on the native Inputs pipeline which processes metadata and front matter for our markdown files. Add a dependency as follows.
public SocialImages()
{
	Dependencies.Add(nameof(Inputs));
}
Statiq pipelines rely on modules that fire at different phases in the pipeline lifecycle. These modules can be InputModules, ProcessModules, PostProcessModules, or OutputModules. For this pipeline, we will rely on several modules that are included in the Statiq framework. You will also learn how to write your own module to handle the image generation portion.
public SocialImages()
{
	Dependencies.Add(nameof(Inputs));

	ProcessModules = new ModuleList
	{
		new GetPipelineDocuments(ContentType.Content),

		// Filter to posts content
		new FilterDocuments(Config.FromDocument(doc => doc.Source.Parent.Segments.Last().SequenceEqual("posts".AsMemory()))),

		new GenerateSocialImage()
	};

	OutputModules = new ModuleList { new WriteFiles() };
}
This module uses several a few process modules. First, we will get documents from the Content pipeline using the GetPipelineDocuments() module. This will load such input documents as our markdown and razor files. Next, we filter these input documents, using the FilterDocuments() module, to only include those documents within the posts folder. If you are using a different structure, you may need to make some changes here to ensure only those documents you are wanting to process will be processed. Next, we call a custom module, called GenerateSocialImage(). We will write the code for this module, momentarily. Finally, we add a module called WriteFiles() to the OutModules list in order to write our generated images to the filesystem during the Output phase of our SocialImages Pipeline.
Add Statiq Module
Adding a module to Statiq is done by inheriting from one of Statiq's Module base classes. For this project, we can inherit from the ParallelModule base class, because it doesn't matter what order our files are processed in. You could also inhreit from SyncModule if your requirements depend on processing files in a certain order. I added this module as an internal class in the same file as the SocialImages pipeline
internal class GenerateSocialImage : ParallelModule
{

}
In order to execute this module for each of the documents we have filtered, overload the ExecuteInputAsync() method.
internal class GenerateSocialImage : ParallelModule
{
	protected override async Task<IEnumerable<IDocument>> ExecuteInputAsync(IDocument input,
		IExecutionContext context)
	{

	}
}
Our code needs to generate a template image upon which we will add our graphic and text elements. For this demonstration, we will add the post title to the image using a specified font.
protected override async Task<IEnumerable<IDocument>> ExecuteInputAsync(IDocument input,
    IExecutionContext context)
{
    using Image _template = new Image<Rgb24>(1200, 630); // create output image of the correct dimensions

    var titleText = input.GetString("Title").ToUpper(); // fetch title from post front matter
    var brandText = "wellsb.com";

    var titleFont = SystemFonts.CreateFont("Arial", 80, FontStyle.Bold); //create fonts
    var brandFont = SystemFonts.CreateFont("Arial", 60, FontStyle.Regular);

    DrawingOptions alignCenter = new DrawingOptions()
    {
        TextOptions = new TextOptions()
        {
            VerticalAlignment = VerticalAlignment.Center,
            WrapTextWidth = 1160,
            HorizontalAlignment = HorizontalAlignment.Center
        }
    };

    DrawingOptions alignRight = new DrawingOptions()
    {
        TextOptions = new TextOptions()
        {
            VerticalAlignment = VerticalAlignment.Center,
            HorizontalAlignment = HorizontalAlignment.Right
        }
    };

    //draw rectangles
    _template.Mutate(x => x
        .Fill(Color.White, new RectangularPolygon(0, 0, 1200, 540)) //body
        .Fill(Color.Black, new RectangularPolygon(0, 540, 1200, 90)) //footer
        );

    //draw texts
    _template.Mutate(x => x
        .DrawText(alignCenter, titleText, titleFont, Color.Black, new PointF(20, 315))
        .DrawText(alignRight, brandText, brandFont, Color.White, new PointF(1165, 585))
        );

    Stream output = new MemoryStream();

    await _template.SaveAsPngAsync(output);

    var destination = $"./assets/images/featured/{input.Source.FileNameWithoutExtension}-social.png";

    var doc =  context.CreateDocument( //create doc to return
        input.Source,
        destination,
        context.GetContentProvider(output));

    return new[] { doc };
}
In the above code, we start by creating a blank template of our desired dimensions. In this case, 1200 pixels by 630 pixels. Next, since the ExecuteInput() method will trigger once for each document, we simply fetch the title (or other front-matter metadata) from the current post. Next, create the fonts you wish to use in your image. For this demo, I am simply using a system font that I know is installed on my local machine. If you intend to deploy your code elsewhere, you should consider creating your font from a .ttf file using something like the SixLabors.Fonts library.
I also created some DrawingOptions objects to specify how I would like my text to align and/or wrap. Next, draw the rectangles onto the _template image using the Fill() method. First, we draw a white rectangle starting at the top left and spanning the entire width of the image (1200 pixels). It will also draw down 540 pixels, leaving 90 pixels at the bottom for a footer. After you finish drawing the rectangles, draw the text onto the image using the DrawText() API. Depending on the alignment options you pass, the text will either center horizontally or align left/right at the coordinates provided. The same applies to vertical alignment.
Finally, save the image to a stream. Statiq will use this stream to save the file to a provided destination relative to the output folder.

The Bottom Line
After I finish writing a new tutorial, I used to detest having to stop and create a corresponding graphic before publishing. Now that I have migrated my site to a powerful static site generator built on .NET, I have a way to automate this mundane task using C#. In this tutorial, you learned how to automate your workflow by using Statiq and an image processing library, such as ImageSharp, to generate social share images for your blog posts. This procedure can be extended to extract all sorts of useful front-matter or other data to include in your featured images.
Did you know?

Our beautiful, multi-column C# reference guides contain more than 150 tips and examples to make it even easier to write better code.
Get your cheat sheets