In this tutorial, you will learn how to write your first WinUI 3 desktop app using the Windows App SDK. The Windows App SDK (previously known as Project Reunion) seeks to solve the problem of operating system level dependencies by providing consistent APIs for Windows 10 and Windows 11 app development. It supports .NET 5 and offers a UI framework with controls to help developers create modern Windows app.
Getting Started
Installing the Windows App SDK is as simple as installing the Project Reunion extension in Visual Studio. From the menu, navigate to Extensions > Manage Extensions. Search for Project Reunion and select Download. Restart Visual Studio to install the Windows App SDK.
Once you have installed the extension, you will be able to create a new project using the WinUI 3 template.
You will be asked to set your app's target platform version and minimum platform version. When the new project has been generated, you will see two solutions in the Solution Explorer. You will write your app's code in the Desktop project. The Project app is used to build an installer executable to make deploying your Windows app easier.
Your First WinUI 3 App - The Basics
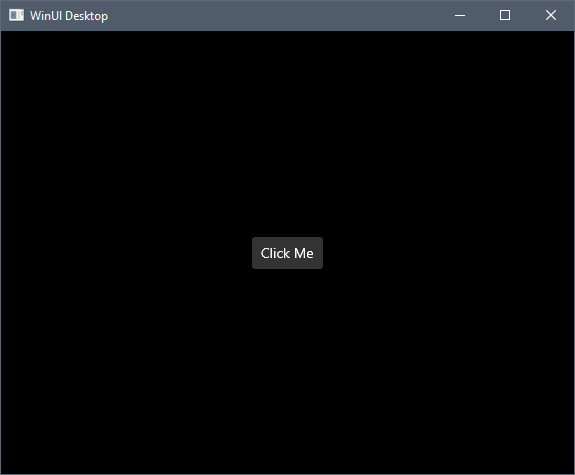
The layout for your app is set in the Desktop project's MainWindow.xaml. Open the file, and you will see a single button labeled Click Me within a stack layout container.
<StackPanel Orientation="Horizontal" HorizontalAlignment="Center" VerticalAlignment="Center">
    <Button x:Name="myButton" Click="myButton_Click">Click Me</Button>
</StackPanel>
The name of the button, myButton, is used to reference this button in the application's code. The button's click handler is assigned via the Click parameter. You can find the myButton_Click() method in the MainWindow.xaml.cs code-behind file.
private void myButton_Click(object sender, RoutedEventArgs e)
{
    myButton.Content = "Clicked";
}
If you run your app right now, you will see a basic Windows application with a single button. Clicking the button will change the label text for myButton to Clicked.
Navigate between Pages
Add New Pages
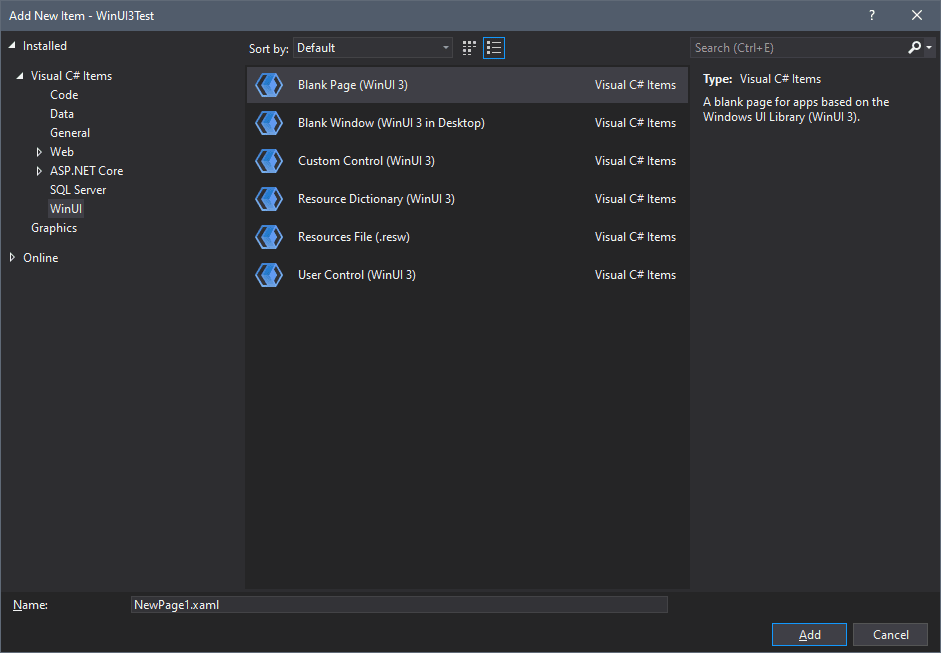
To make things a little more interesting, let's add a new page to this WinUI 3 desktop app. In the Solution Explorer, right click the Desktop project and create a new folder called Pages. Right click the folder you just created and select Add > New Item.... In the left page, under the list of Installed Visual C# Items, select WinUI. You will see a list of available WinUI item templates. Select Blank Page (WinUI 3) and name it Page1.xaml.
You may notice, as of version 0.5 of Project Reunion, there is no toolbox or visual editor, so for now you will have to create your layout using XAML. On your new page, create a layout with a TextBlock element and a Button. My example uses a Grid to to position the two child elements. Inside the Page element, add the following layout.
<Grid
Padding="8,8,8,8"
HorizontalAlignment="Center">
<Grid.RowDefinitions>
<RowDefinition Height="auto"/>
<RowDefinition Height="*"/>
<RowDefinition Height="auto"/>
<RowDefinition Height="*"/>
</Grid.RowDefinitions>
<TextBlock
Grid.Row="0"
FontSize="36"
FontWeight="Bold"
TextAlignment="Center"
TextWrapping="WrapWholeWords"
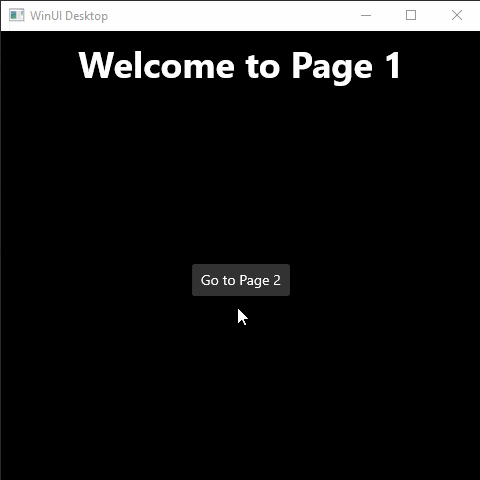
Text="Welcome to Page 1" />
<Button
Grid.Row="2"
HorizontalAlignment="Center"
x:Name="page1Button"
Click="page1Button_Click">Go to Page 2</Button>
</Grid>
The button's click handler is defined as page1Button_Click() method. Create the method in the Page1 code-behind file Page1.xaml.cs.
private void page1Button_Click(object sender, RoutedEventArgs e)
{
    this.Frame.Navigate(typeof(Page2));
}
The above method will navigate the current frame to Page2 when the Page1 button is clicked. Now create a second page called Page2 and create the same layout and button click handler, but this time navigate back to Page 1.
<Grid
    Padding="8,8,8,8"
    HorizontalAlignment="Center">
        <Grid.RowDefinitions>
            <RowDefinition Height="auto"/>
            <RowDefinition Height="*"/>
            <RowDefinition Height="auto"/>
            <RowDefinition Height="*"/>
        </Grid.RowDefinitions>
        <TextBlock
			Grid.Row="0"
			FontSize="36"
			FontWeight="Bold"
			TextAlignment="Center"
			TextWrapping="WrapWholeWords"
			Text="Welcome to Page 2" />
        <Button
			Grid.Row="2"
			HorizontalAlignment="Center"
			x:Name="page2Button"
			Click="page2Button_Click">Go to Page 1</Button>
</Grid>
private void page2Button_Click(object sender, RoutedEventArgs e)
{
    this.Frame.Navigate(typeof(Page1));
}
Update MainWindow
Next, modify the MainWindow layout to add the frame element referenced by our pages. Open MainWindow.xaml and replace the existing StackPanel layout with a simple Frame element called mainFrame.
<Grid>
    <Frame x:Name="mainFrame" />
</Grid>
Finally, we need to load Page1 into the mainFrame when the MainWindow is initialized by adding the following line in MainWindow.xaml.cs.
public MainWindow()
{
    this.InitializeComponent();
    mainFrame.Navigate(typeof(Pages.Page1));
}
Launch WinUI 3 App
When you launch your app, Page1 will be loaded by default. When you click the button, your app will navigate to Page2.
The Bottom Line
In this tutorial, you configured your development environment to create WinUI 3 apps for Windows 10 and Windows 11 using the Windows App SDK (Project Reunion). You then created your first app and created a functional layout using XAML. You configured your app with two pages, buttons, event handlers, and navigation. The Windows App SDK has native navigation controls, like NavigationView and TabView, but this tutorial should help you understand how to implement those control elements. What apps will you build using WinUI 3?
Don't stop learning!
There is so much to discover about C#. That's why I am making my favorite tips and tricks available for free. Enter your email address below to become a better .NET developer.
Did you know?

Our beautiful, multi-column C# reference guides contain more than 150 tips and examples to make it even easier to write better code.
Get your cheat sheets