Do you find yourself writing code that you would like to reuse across multiple C# projects? In this tutorial, you will learn how to create a class library and add a reference to it in your projects.
What is a Class Library?
By creating a C# class library, you are creating a package that can be included in your projects. This package contains code, like classes and methods, that you find useful enough to use across multiple applications.
When you build a C# class library, a .dll file is created. By referencing this DLL file in your other projects, you will be able to use the classes and methods contained within. You can also distribute your class library through package management repositories or through open-source projects to allow other developers to use the functions you have created.
How to Create a Class Library
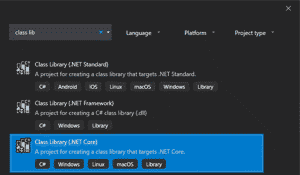
To create a C# class library project from the New Project dialog, (File > New > Project...), select the Class Library (.NET Core) project type.

In a previous tutorial, you wrote a method to read a specific line number from a text file. In this tutorial, you will build off that example by creating a class library, called FileIOLibrary.
The class library project layout looks similar to what you expect from a typical C# project. Add the following code to your library's .cs file.
using System;
using System.IO;

namespace FileIOLibrary
{
    public class FileIO
    {
        public string ReadLine(string filePath, int lineNumber)
        {
            return ReadSpecificLine(filePath, lineNumber);
        }

        private string ReadSpecificLine(string filePath, int lineNumber)
        {
            using (StreamReader file = new StreamReader(filePath))
            {
                string content = null;
                for (int i = 1; i < lineNumber; i++)
                {
                    file.ReadLine();

                    if (file.EndOfStream)
                    {
                        break;
                    }
                }
                content = file.ReadLine();
                return content;
            }
        }
    }
}
The namespace identifier on line 4 is the dependency name you will reference via a using directive in your client projects. Here, I have chosen the name FileIOLibrary.
The name of the public class on line 6 is the name you will reference when you are ready to instantiate an instance of the class object in your projects. Here, I have called it FileIO.
This class has one public method and a private helper method. Once you have initialized a class object, you will be able to call the public method from your other projects. The private method cannot be called from outside this class.
Remember, you can always overload method constructors in order to provide different ways to call the function. As an exercise, consider creating an overloaded version of the ReadLine() method that takes three input parameters ReadLine(string directoryName, string fileName, int lineNumber).
You can add several other public methods to this library. For example, you may wish to add a ReadFile() method, a WriteFile() method, and a WriteFileAsync() method to the same class library. Then, any time you have a project that requires File I/O operations, you could import your library and have an easy way to access the methods needed by your project.
Using a Class Library DLL
When you build a typical C# project file, an executable .EXE file is generated. When you build a class library project, a .DLL file is created in the source directory. By simply adding a reference to this .DLL file, any of your projects will be able to take advantage of the custom classes and methods you have written.
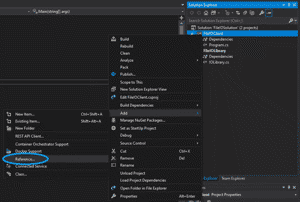
For this tutorial, add a second project to your solution, of type Console App (.NET Core). Name the project FileIOClient. To import the .DLL, locate the client project in the Solution Explorer. Right click it and Add > Reference.

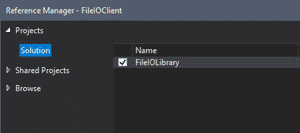
If the class library is in the same solution as your current project, you will find it in the Projects > Solution pane. Otherwise, you can Browse... for the .dll file directly.

Once you have successfully added a reference to the class library, simply include it via a using directive. You will declare the reference using the name of the library's namespace. Refer to Line 4 in the example above.
using FileIOLibrary;
Following is an example of a client-side application that uses the class library we previously wrote. Notice, we are able to reference the library's custom classes and methods, even though they are outside of the namespace of our current project.
static void Main(string[] args)
{
    string filePath = "ReadFile.txt";
    int lineNumber = 3;

    string lineContents = null;

    try
    {
        FileIO fileIO = new FileIO();
        lineContents = fileIO.ReadLine(filePath, lineNumber);
    }
    catch (IOException e)
    {
        Console.WriteLine("There was an error reading the file: ");
        Console.WriteLine(e.Message);
    }

    if (lineContents != null)
        Console.WriteLine(lineContents);

    Console.ReadLine();
}
After you instantiate a new instance of the FileIO class (Line 18), you are free to use its methods in your new project. On Line 19, for example, I have called the ReadLine() method that we wrote in the class library project.
A Note About Error Handling
It is important to follow best practices when creating class libraries. For example, you may have noticed that our class library code includes minimal error checking. The class library should be left to throw exceptions, because it is the responsibility of the client to appropriately handle exceptions. Notice it is the client-side File I/O operations that are enclosed in the try/catch block, not those of the class library itself.
Did you know?

Our beautiful, multi-column C# reference guides contain more than 150 tips and examples to make it even easier to write better code.
Get your cheat sheets