The Meadow board is an embeddable hardware solution by Wilderness Labs built on the STM32F7 microcontroller chip that you can program using your existing .NET skills.
The Hardware
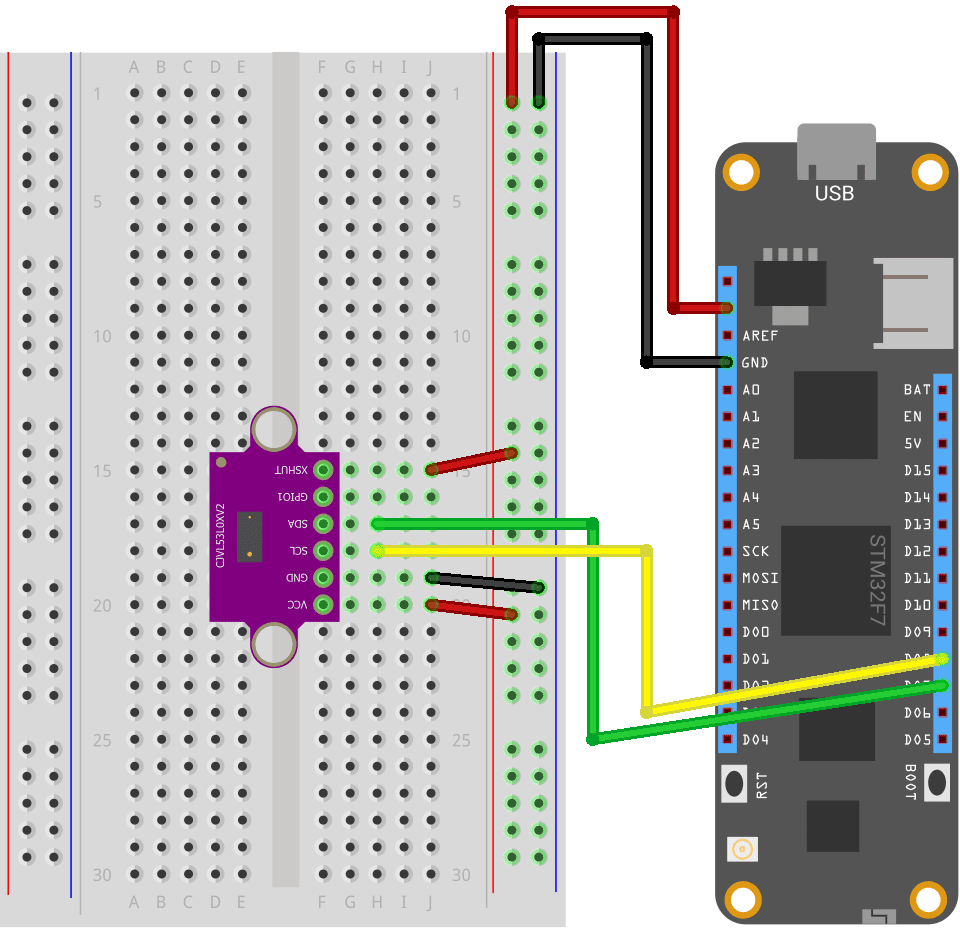
In this tutorial, we will use a VL53L0X sensor to measure distance. The VL53L0X is a time-of-flight sensor that uses laser ranging to accurately measure distance up to two meters. Rather than ultrasonic distance sensors that require calculating distance based on time between pulses, communication on the laser-ranging sensor is done through an I2C interface.
Digital pins D07 and D08 on the Meadow board are used for I2C communications. D07 is the I2C Data line and D08 is the I2C Clock line. Wire the SDA pin of your VL53L0X range sensor to D07 and wire the SCL pin to D08 on your Meadow board. Next, wire VIN and GND on the distance sensor to the 3V3 and GND pins on the Meadow, respectively. Finally, I am drawing the XSHUT reset pin high by wiring it directly to the 3V3 rail. You can drive it using a digital pin instead if your application will require manually resetting the distance sensor, for example if you are connecting multiple peripherals to the same I2C bus.
Consider the following wiring diagram.
The Code
Now that your circuit is wired up, connect the Meadow board to a USB port on your computer. Launch Visual Studio and create a new Meadow Application. Take note of the serial port (e.g. COM4) your Meadow board is connected through. You can select your device from View > Other Windows > Meadow.
If you have not already downloaded the Nuget package for working with the VL53L0X sensor, download it using the Package Manager Console.
Install-Package Meadow.Foundation.Sensors.Distance.Vl53l0x
In MeadowApp.cs, create a global variable of type Vl53l0x.
Vl53l0x distanceSensor;
Next, edit the Initialize() method to create an I2C bus. This is the bus your distance sensor will use for communicating with the microcontroller unit. Then, configure the distance sensor using the I2C bus you just created.
void Initialize()
{
    Console.WriteLine("Initialize distance sensor");
    var i2cBus = Device.CreateI2cBus(I2cBusSpeed.FastPlus);
    distanceSensor = new Vl53l0x(Device, i2cBus);
}
By default, the sensor provides measurements in millimeters. However, it can also be configured to measure in centimeters or inches by passing the desired unit type on object instantiation. For example:
distanceSensor = new Vl53l0x(Device, i2cBus, Vl53l0x.DefaultI2cAddress, Vl53l0x.UnitType.cm);
The MeadowApp() method should invoke the Initialize() method and then begin sampling from the sensor.
public MeadowApp()
{
    Initialize();

    Console.WriteLine("Start sampling");
    distanceSensor.Updated += DistanceUpdated;
    distanceSensor.StartUpdating(100);
}
You will notice we have attached a handler, DistanceUpdated, to the Updated event of our Vl53l0x object, distanceSensor. This event will trigger each time the distance being measured changes. Configure the event handler as follows:
private void DistanceUpdated(object sender, DistanceConditionChangeResult e)
{
    if (e.New == null || e.New.Distance == null)
    {
        return;
    }

    Console.WriteLine($"{e.New.Distance.Value}mm");
}
If the new distance is valid, its value will be printed to the debug console. The complete code may look like the following:
public class MeadowApp : App<F7Micro, MeadowApp>
{
    Vl53l0x distanceSensor;

    public MeadowApp()
    {
        Initialize();

        Console.WriteLine("Start sampling");
        distanceSensor.Updated += DistanceUpdated;
        distanceSensor.StartUpdating(100);
    }

    void Initialize()
    {
        Console.WriteLine("Initialize distance sensor");
        var i2cBus = Device.CreateI2cBus(I2cBusSpeed.FastPlus);
        distanceSensor = new Vl53l0x(Device, i2cBus);
    }

    private void DistanceUpdated(object sender, DistanceConditionChangeResult e)
    {
        if (e.New == null || e.New.Distance == null)
        {
            return;
        }

        Console.WriteLine($"{e.New.Distance.Value}mm");
    }
}
Add LCD Display
Wiring the circuit
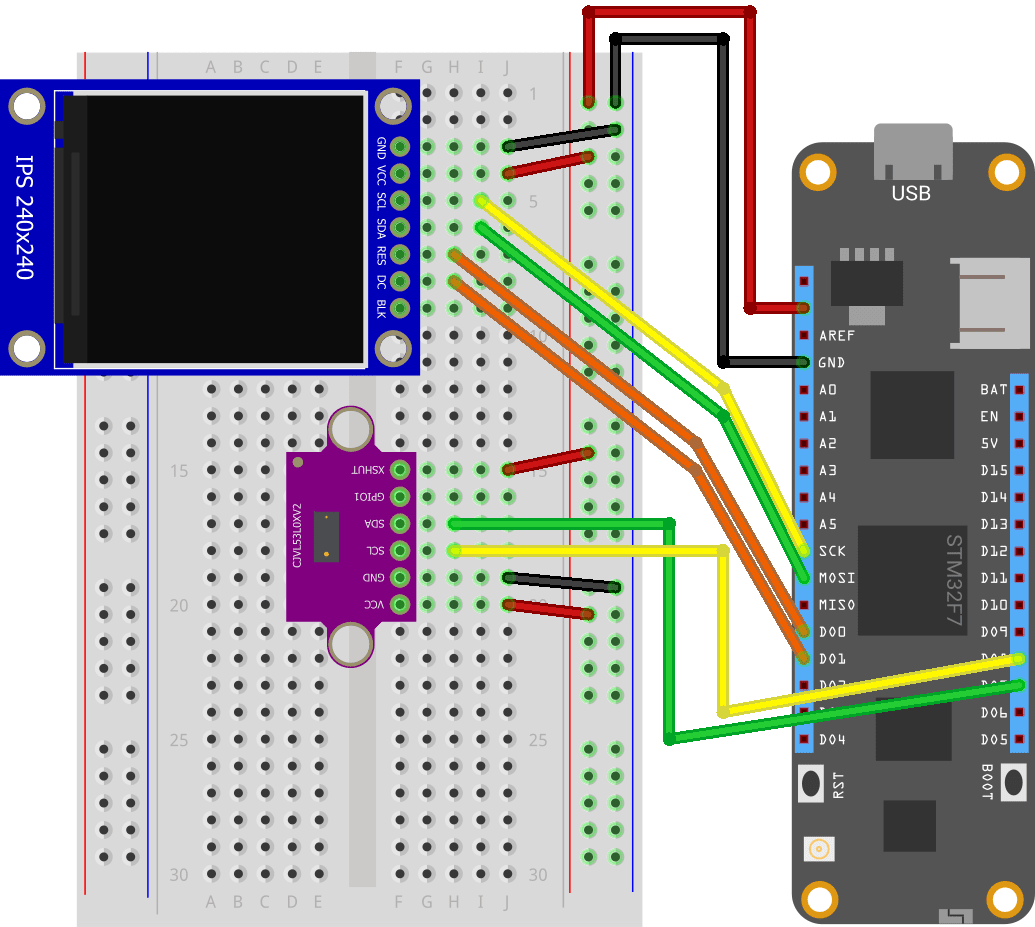
The program above is somewhat interesting, but wouldn't it be cooler if show the distance on an LCD display instead? For this, we will use a ST7789 LCD display.
The ST7789 uses an SPI interface for communication. Connect the GND and VCC pins on the LCD display to the ground and 3.3V rail, respectively. Next, connect the SPI clock (SCL) and SPI data (SDA) lines to the Meadow's SCK and MOSI pins.
Similar to XSHUT on the distance sensor, the Reset pin RES on the LCD display can be driven from a digital output port. It should normally be HIGH, but it can be pulled LOW to reset the device. In this example, we will connect it to digital port D00 on the Meadow. Finally, connect the display's DC pin to D01. This pin is used to determine whether data or a command is being sent to the LCD display.
The BLK pin controls the backlight of the display. If you wish to turn off the backlight, simply pull the pin low. You could wire BLK to an output pin on the microcontroller board and toggle it from high to low when a push button is pressed, for example. We will just leave the pin hanging, as the backlight will remain on for this demo.
Writing the code
To set up and use your ST7789 display with Meadow, we will use the following extra namespaces. Be sure to download the appropriate Nuget packages if you do not already have them installed.
using Meadow.Foundation.Displays.Tft;
using Meadow.Foundation.Graphics;
Recall that the ST7789 relies on a SPI interface, so we first must initialize a SPI bus.
var config = new SpiClockConfiguration(12000, SpiClockConfiguration.Mode.Mode3);
var spiBus = Device.CreateSpiBus(Device.Pins.SCK, Device.Pins.MOSI, Device.Pins.MISO, config);
I am running my SPI clock at 12000 Hz. It takes a not insignificant amount time to write graphical data to a display over SPI, so feel free to experiment here. The overload for creating a SPI bus requires defining a pin for MISO (Master-In, Slave-Out). The LCD display is a write-only device, so we don't actually have to connect anything to that pin on our Meadow.
Now that the SPI bus has been configured, you can set up the ST7789 display device.
St7789 display;
St7789 display = new St7789(device: Device, spiBus: spiBus,
    chipSelectPin: null,
    dcPin: Device.Pins.D01,
    resetPin: Device.Pins.D00,
    width: 240, height: 240);
Notice we have passed the pins we will be using to drive the DC pin and RES pin on our LCD device to the object initializer constructor. This particular screen has a 240 x 240 pixel display, but you don't have to push all the pixels. You could configure your application to only use one quarter of the screen, for example, by setting width and height to 120.
Now is the time to configure a graphics library. The Meadow.Foundation graphics library provides a framework for working with pixel display devices to easily write text, draw shapes, and even display images. Start by setting up a canvas as a global variable. This will allow us to draw on the canvas from the handler for distance sensor's Updated event.
GraphicsLibrary canvas;
We need to configure a font to use on our display. I also like to clear the canvas by drawing a black rectangle and updating the display to remove any lingering artifacts.
canvas = new GraphicsLibrary(display)
{
    CurrentFont = new Font12x20()
};
canvas.DrawRectangle(0, 0, 240, 240, Color.Black, true);
canvas.Clear(true);
Finally, update the DistanceUpdated() handler method to also write the new sensor data to the display instead of only printing to the console.
private void DistanceUpdated(object sender, DistanceConditionChangeResult e)
{
    if (e.New == null || e.New.Distance == null)
    {
        return;
    }

    Console.WriteLine($"{e.New.Distance.Value}mm");

    canvas.DrawRectangle(70, 90, 144, 40, Color.Black, true);
    canvas.DrawText(70, 90, $"{e.New.Distance.Value}mm", Color.White, GraphicsLibrary.ScaleFactor.X2);
    canvas.Show();
}
I like to use the DrawRectangle() method of the GraphicsLibrary class to overwrite the space I will be drawing to. Next, use DrawText() to print the new distance value to the appropriate part of the screen. Calling the Show() method will push the contents of the canvas to the display.
Bringing it all together
In this tutorial, you learned how to use a VL53L0X time-of-flight range sensor with a Meadow microcontroller board. You, then, displayed the sensor data onto a ST7789 LCD screen. Your final project code may look like the following.
using Meadow;
using Meadow.Devices;
using Meadow.Foundation;
using Meadow.Foundation.Displays.Tft;
using Meadow.Foundation.Graphics;
using Meadow.Foundation.Sensors.Distance;
using Meadow.Hardware;
using Meadow.Peripherals.Sensors.Distance;
using System;
using System.Threading;


namespace MeadowDistanceSensor
{
    public class MeadowApp : App<F7Micro, MeadowApp>
    {
        GraphicsLibrary canvas;
        Vl53l0x distanceSensor;

        public MeadowApp()
        {
            Initialize();

            Console.WriteLine("Start sampling");
            distanceSensor.Updated += DistanceUpdated;
            distanceSensor.StartUpdating(100);
        }

        void Initialize()
        {
            Console.WriteLine("Initializing hardware...");

            Console.WriteLine("Initialize SPI bus");

            var config = new SpiClockConfiguration(12000, SpiClockConfiguration.Mode.Mode3);
            var spiBus = Device.CreateSpiBus(Device.Pins.SCK, Device.Pins.MOSI, Device.Pins.MISO, config);

            Console.WriteLine("Initialize display driver instance");

            St7789 display = new St7789(device: Device, spiBus: spiBus,
                chipSelectPin: null,
                dcPin: Device.Pins.D01,
                resetPin: Device.Pins.D00,
                width: 240, height: 240);

            Console.WriteLine("Create graphics library");

            canvas = new GraphicsLibrary(display)
            {
                CurrentFont = new Font12x20()
            };
            canvas.DrawRectangle(0, 0, 240, 240, Color.Black, true);
            canvas.Clear(true);

            Console.WriteLine("Initialize distance sensor");
            var i2cBus = Device.CreateI2cBus(I2cBusSpeed.FastPlus);
            distanceSensor = new Vl53l0x(Device, i2cBus);
        }

        private void DistanceUpdated(object sender, DistanceConditionChangeResult e)
        {
            if (e.New == null || e.New.Distance == null)
            {
                return;
            }

            Console.WriteLine($"{e.New.Distance.Value}mm");

            canvas.DrawRectangle(70, 90, 144, 40, Color.Black, true);
            canvas.DrawText(70, 90, $"{e.New.Distance.Value}mm", Color.White, GraphicsLibrary.ScaleFactor.X2);
            canvas.Show();
        }
    }
}
Source code for this project is also available on GitHub. If you have any questions, let me know in the comments or on Twitter @bradwellsb.
Here is a video demonstration of the project.
Don't stop learning!
There is so much to discover about C#. That's why I am making my favorite tips and tricks available for free. Enter your email address below to become a better .NET developer.
Did you know?

Our beautiful, multi-column C# reference guides contain more than 150 tips and examples to make it even easier to write better code.
Get your cheat sheets