In the previous tutorial, you learned how to send data from a PC to an Arduino microcontroller. In this follow-up tutorial, you will write a .NET desktop program that will listen for sensor data sent from an Arduino.
Wiring the Circuit
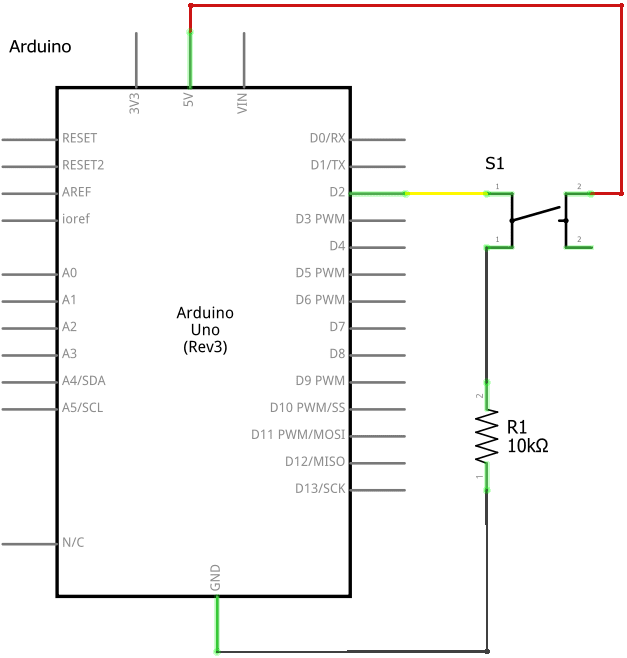
For the electronics portion of this project, you will need a resistor and a pushbutton switch. I will use a 10kΩ resistor as my pull-down resistor, but anything between 1kΩ and 10kΩ will work. Wire up the circuit according to the following diagram.
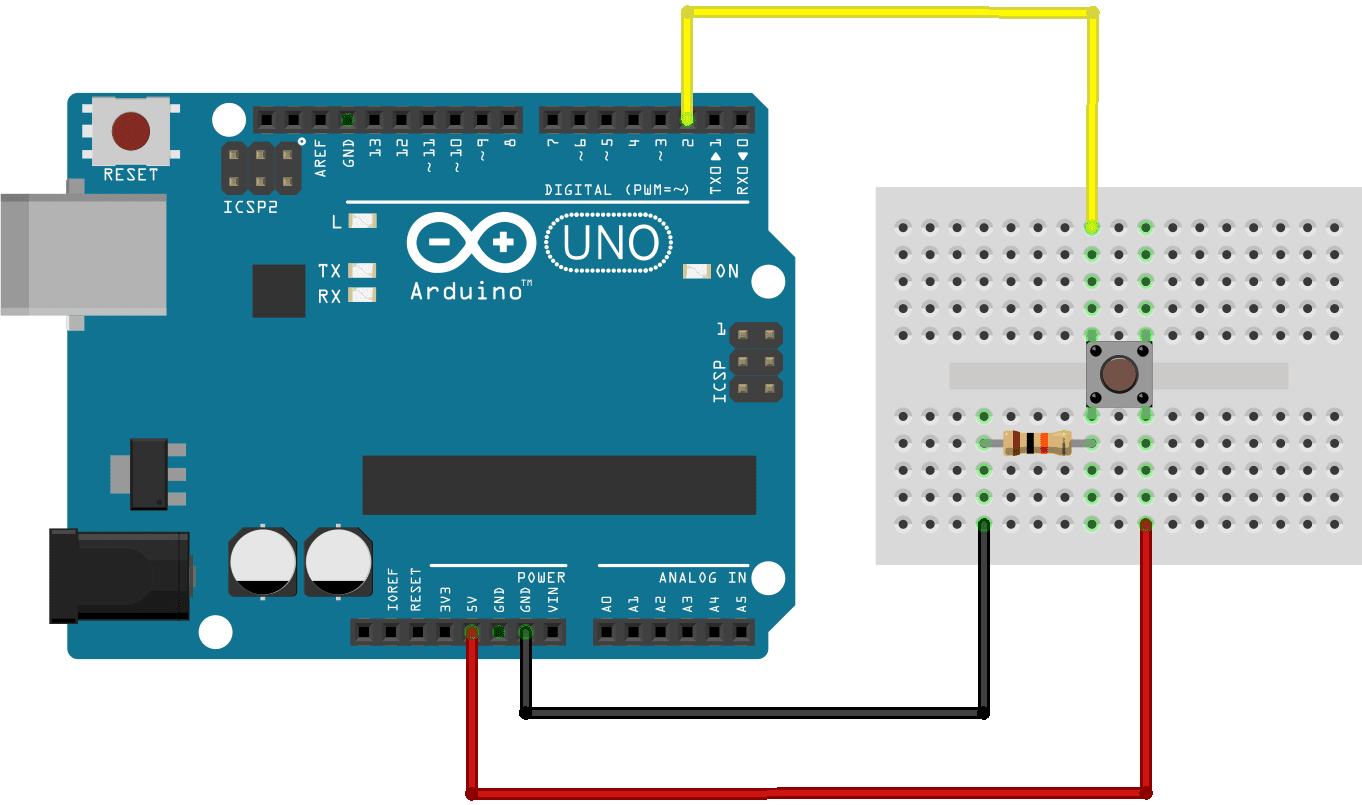
We will read the state of the switch using digital input D2 on the Arduino. If the button is pressed, the switch will close and the value on pin D2 will be HIGH (+5V). If the button is not pressed, pin D2 will be LOW, because it is being pulled to ground through the pull-down resistor. Refer to the schematic diagram for this circuit for details.
Programming the Arduino
The program for the Arduino will continuously read the value on input pin D2. If the value is HIGH, that means the button is being pressed. For the first part of this tutorial, we will toggle the state of the Arduino Uno's onboard LED, which is tied to pin D13, when the button is pressed in order to verify that everything is wired up correctly. Upload the following sketch to your Arduino microcontroller.
int ledPin = 13; //integrated LED
int buttonPin = 2;

void setup() {
  pinMode(ledPin, OUTPUT);
  pinMode(buttonPin, INPUT);
}

void loop() {
  if(digitalRead(buttonPin) == HIGH){
      digitalWrite(ledPin, !digitalRead(ledPin));
      delay(500); //wait half second before reading again
  }
}
As you can see in the setup() function, we have configured pin D13 as an output to drive the LED and pin D2 as an input to read the state of the pushbutton. Finally, the main loop() of the program effectively reads the voltage on input pin D2 and toggles the LED on or off. I included a 500 millisecond delay to ensure that a single button press only triggers the LED toggle one time. In a real world application, you might use a more robust debounce method.
Once you have verified your hardware is wired up correctly, let's add some code to communicate with a PC.
In the setup() function, initialize serial communication by adding the following line.
Serial.begin(9600);
In the loop() function, print a string value to the serial port. We will listen for this string in our WPF app on the computer. For example
Serial.println("pushbutton");
The println() function will send the entire string over the serial port followed by a carriage return \r and newline \n character.
If you remove references to the output LED we were using for debugging, your final Arduino program will look like the following. Don't forget to upload the sketch to your Arduino device.
int buttonPin = 2;

void setup() {
  pinMode(buttonPin, INPUT);
  Serial.begin(9600);
}

void loop() {
  if(digitalRead(buttonPin) == HIGH){
      Serial.println("pushbutton");
      delay(500); //wait half second before reading again
  }
}
Coding the .NET Serial Listener
For the C# serial port listener app, open Visual Studio and create create a new WPF desktop application. In MainWindow.xaml, add a rectangle and label to the user interface. Give the label the name pressedLabel and name the rectangle bgRect. We will use these names later to programmatically change the content of the label and the color of the background when a button is pressed.
<Rectangle Name="bgRect" Stroke="Black" Height="100" Width="200" HorizontalAlignment="Center" VerticalAlignment="Center" />
<Label Name="pressedLabel" Content="0" HorizontalAlignment="Center" VerticalAlignment="Center" FontSize="64" FontWeight="Bold" />
Next, open MainWindow.xaml.cs and initialize the serial port. My Arduino is connected through COM3 and I have configured mine with a baud rate of 9600. If yours is connected through a different serial port, be sure to make the necessary adjustments.
private static int _pressedCount = 0;
private static SerialPort _serialPort;
public MainWindow()
{
    InitializeComponent();
    _serialPort = new SerialPort("COM3", 9600);
    _serialPort.DataReceived += new SerialDataReceivedEventHandler(DataReceivedHandler);
    _serialPort.Open();
}
We will use the _pressedCount integer later to track how many times the button has be pressed.
You will have noticed I added an event handler to fire when data is received on the serial port. I called the handler method DataReceivedHandler(). This is where I will check the data received over the serial port and perform some action if it matches signal sent by the Arduino when the pushbutton is pressed. Remember, the Arduino will send the string "pushbutton" when the switch is activated. Let's configure DataReceived event handler.
private static Brush _brush;
private static Random _random;
private void DataReceivedHandler(object sender, SerialDataReceivedEventArgs e)
{
    SerialPort sp = (SerialPort)sender;
    string incomingData = sp.ReadLine().TrimEnd('\r');
    if (incomingData.ToLower() == "pushbutton")
    {
        _pressedCount++;
        _random = new Random();
        Dispatcher.Invoke(() =>
        {
            _brush = new SolidColorBrush(
                Color.FromRgb(
                (byte)_random.Next(255),
                (byte)_random.Next(255),
                (byte)_random.Next(255)
            ));
            bgRect.Fill = _brush;
            pressedLabel.Content = $"{_pressedCount}";
        });
    }
}
The ReadLine() method of the SerialPort class will read up to the newline character \n in the input buffer of the configured serial port. Don't forget the Arduino also sends a carriage return \r, so we will trim that off the end of the string. Feel free to use the print function in your Arduino program instead of println in order to configure a different stop bit.
If the data in the serial port buffer matches the value we are expecting from the Arduino, we can increment the _pressedCount integer and update the value of the pressedLabel content. To make the demo app interesting, I will also change the background color of the rectangle each time the button is pressed. To generate a random background color, I use a pseudo-random number generator to generate random RGB values and I assign the resulting color to a new Brush object. We must use Dispatcher.Invoke() to make changes to the UI thread, because the thread triggered by the event handler does not have access to the UI thread.
Now both the Arduino and .NET side of this electronics project are complete. With your Arduino plugged into a USB port on your computer, run the WPF application. Each time you press the pushbutton connected to the Arduino, the counter on your computer will increment and the background will change to a new random color.

Why is this useful?
Serial communication is a useful tool for interfacing a microcontroller with other components, including a PC. You could directly use this project's hardware and code to create a smart doorbell that opens a MessageBox alert on your computer when somebody rings it. Or, you could extend this project to work with other sensors. Consider an example using a motion sensor or range detector. With C#, you could even create a connected app to interface with an Arduino microcontroller and a temperature sensor placed inside your desktop computer to monitor your computer temperature and alert you if your computer gets too hot. With .NET and Arduino, the possibilities are endless.
Don't stop learning!
There is so much to discover about C#. That's why I am making my favorite tips and tricks available for free. Enter your email address below to become a better .NET developer.
Did you know?

Our beautiful, multi-column C# reference guides contain more than 150 tips and examples to make it even easier to write better code.
Get your cheat sheets