You will make a menu-driven program in this tutorial. Using a while loop, you will learn how to add a menu to a C# console application. This technique helps your users navigate your app, and it enables you to create more robust C# programs.
If you have been following our beginners tutorial series, you have written simple applications that highlight some of the basic functionality of C# and .NET Core. In this tutorial, we will merge some of these examples into a non-trivial application using some of the techniques you have already learned.
Pseudo-code for Console Menu
In short, our menu-driven console application will use a While Loop that will call a Main Menu method. The Main Menu method will print all menu options to the console and wait for the user to choose an option. Once the user selects an option, the program will execute the code block pertaining to the selected option. Here's how it might look as a pseudo-code:
Main() {
    Loop {
        MainMenu();
    }
}

MainMenu() {
    print "option 1";
    print "option 2";
    ...
    wait user input;

    if option1
        do something1;
    if option2
        do something2;
}
The Main() Method
In the previous two tutorials, we learned some useful C# string manipulation techniques - reverse string, and remove whitespace. In this tutorial, our menu-driven console application will use some of the methods we wrote in the previous tutorials and combine them into a useful, fully functional string manipulation program.
We will begin with the static void Main() method. We want the application's menu to appear until the user chooses to exit the program. Add the following code:
static void Main(string[] args)
{
    bool showMenu = true;
    while (showMenu)
    {
        showMenu = MainMenu();
    }
}
On Line 12, the MainMenu() is invoked inside the while loop. This method will return a bool value, and the loop will iterate as long as that value is true. If the user chooses to exit the program, the MainMenu() method should return a false value. When this happens, the loop will stop and the application will close.
Building the Console Menu
The MainMenu() method should first print the menu options to the console so the user is able to make a selection. Next, it will read the user's response and determine which option was selected. Based on the option that was selected, the program will call the appropriate method.
private static bool MainMenu()
{
Console.Clear();
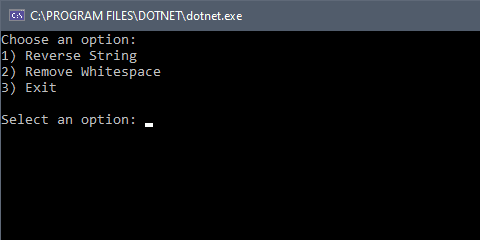
Console.WriteLine("Choose an option:");
Console.WriteLine("1) Reverse String");
Console.WriteLine("2) Remove Whitespace");
Console.WriteLine("3) Exit");
Console.Write("\r\nSelect an option: ");
switch (Console.ReadLine())
{
case "1":
ReverseString();
return true;
case "2":
RemoveWhitespace();
return true;
case "3":
return false;
default:
return true;
}
}
On Line 17, I am using Console.Clear() to ensure the menu will be printed onto a blank console screen. This will be important for tidiness, because other methods in my console application will also write to the console window. The menu options themselves are printed on Lines 18-22.
On Lines 24-37, I am using a switch statement. The switch-case construct is a good alternative to using multiple if-else statements. It checks an expression against a number of possible values. In this case, we are reading what the user entered to determine whether they selected option "1," "2," or "3."
Based on the value the user enters, we will invoke either the ReverseString() method or the RemoveWhitespace() method. If the user selects Option 3, the MainMenu() method will return false (Line 33) and the program will terminate. The default case will catch situations where the user enters values other than 1, 2, or 3. In this case, the method will return true and the menu will reset allowing the user to try again.
A Complete Example
Now, we will simply add the [ReverseString()](https://wellsb.com/csharp/beginners/string-manipulation-reverse-string-csharp/) and [RemoveWhitespace()](https://wellsb.com/csharp/beginners/string-manipulation-csharp-trim-whitespace/) methods from our previous tutorials and display the results to the user. Here is our complete String Manipulation program:
using System;

namespace StringManipulation
{
    class Program
    {
        static void Main(string[] args)
        {
            bool showMenu = true;
            while (showMenu)
            {
                showMenu = MainMenu();
            }
        }
        private static bool MainMenu()
        {
            Console.Clear();
            Console.WriteLine("Choose an option:");
            Console.WriteLine("1) Reverse String");
            Console.WriteLine("2) Remove Whitespace");
            Console.WriteLine("3) Exit");
            Console.Write("\r\nSelect an option: ");

            switch (Console.ReadLine())
            {
                case "1":
                    ReverseString();
                    return true;
                case "2":
                    RemoveWhitespace();
                    return true;
                case "3":
                    return false;
                default:
                    return true;
            }
        }

        private static string CaptureInput()
        {
            Console.Write("Enter the string you want to modify: ");
            return Console.ReadLine();
        }

        private static void ReverseString()
        {
            Console.Clear();
            Console.WriteLine("Reverse String");

            char[] charArray = CaptureInput().ToCharArray();
            Array.Reverse(charArray);
            DisplayResult(String.Concat(charArray));
        }

        private static void RemoveWhitespace()
        {
            Console.Clear();
            Console.WriteLine("Remove Whitespace");

            DisplayResult(CaptureInput().Replace(" ", ""));
        }

        private static void DisplayResult(string message)
        {
            Console.WriteLine($"\r\nYour modified string is: {message}");
            Console.Write("\r\nPress Enter to return to Main Menu");
            Console.ReadLine();
        }
    }
}
The Bottom Line
In this tutorial, you learned how to add a menu to your C# console application. You created a method to display a menu and called that method from inside a while loop. You processed the user's selection and triggered the relevant methods. Finally, you returned a boolean value to determine whether to continue to show the menu. This technique allows you to create more complicated console programs while still maintaining a user-friendly interface. Your end users will be able to easily navigate your application and find the features they need. What kind of programs will you create with this technique? Let me know in the comments!
Don't stop learning!
There is so much to discover about C#. That's why I am making my favorite tips and tricks available for free. Enter your email address below to become a better .NET developer.
Did you know?

Our beautiful, multi-column C# reference guides contain more than 150 tips and examples to make it even easier to write better code.
Get your cheat sheets