To asynchronously write to a text file in C#, you will use the StreamWriter constructor within an async method. StreamWriter can also be used to write strings to a file synchronously, or to append to an existing file. To use StreamWriter asynchronously, include the following using directives in your project file.
using System.IO;
using System.Threading.Tasks;
Write to File Asynchronously
In some cases, it can be helpful to do file I/O asynchronously. Writing to a file asynchronously allows your application to continue executing other tasks while the file is being written. This is helpful when writing large amounts of data or when you will not need to read content from the file immediately. Performing read/write operations asynchronously is especially useful with GUI applications, because the program's user-interface can still be redrawn (if window is resized, for example), while the file I/O operation is being completed.
The Async Method
To get started, create an async method called WriteFileAsync(). This method will take arguments for the directory path, file name, and the content to write to the file.
static async Task WriteFileAsync(string dir, string file, string content)
{
    Console.WriteLine("Async Write File has started".);
    using (StreamWriter outputFile = new StreamWriter(Path.Combine(dir, file)) )
    {
        await outputFile.WriteAsync(content);
    }
    Console.WriteLine("Async Write File has completed".);
}
It is good practice for async methods to return a Task, as demonstrated on Line 25. This enables you to ensure that the task is completed, using asyncTask.Wait() or asyncTask.IsCompleted() before trying to do something with the results of the asynchronously executed code block.
Also on Line 25, take note of the method name WriteFileAsync(). It is a widely-accepted naming convention to append "Async" to the name of all asynchronous methods.
The using keyword on Line 28 is different from the using directives we usually include at the beginning of our project files. Used as a statement, the using keyword helps ensure that the Dispose() method of the referenced object is called correctly, even if an exception occurs. In this case, it helps ensure the StreamWriter object is properly disposed of so the file being written is never locked in a read-only state.
Note, when creating a new StreamWriter instance (line 28), you can omit the directory path altogether to place the file in your project directory.
The await keyword on Line 30 is the code we are actually asynchronously awaiting to complete. It is this code that writes the content to the file, so it is this file i/o operation that we want to run in the background while our program performs other tasks.
The Main Method
Next, begin constructing the Main() method. You will need to set the directory path, filename, and content to pass to the method you created above. The directory could be hard coded (e.g. C:\Users\wellsb\Desktop\) or you may use the system's environment variables to define the path to a known folder, such as your Desktop. Consider the example below.
static void Main(string[] args)
{
    string dirPath = Environment.GetFolderPath(Environment.SpecialFolder.Desktop);
    string fileName = "AsyncWriteFile.txt";

    string longString = BuildLongString("Learn C# at wellsb.com");

    Task asyncTask = WriteFileAsync(dirPath, fileName, longString);

    //execute some code while file is written
    ExecuteSynchronousCode();

    Console.ReadLine();
}
For the purpose of demonstrating the asynchronous feature, I needed a sufficiently long string to write to the disk. I created a method (called on Line 15) that uses a StringBuilder (using System.Text;) to create a long string. See the complete example at the bottom of the tutorial for all the details.
The method called on Line 20 will run even before the asynchronous file write operation (from Line 17) is completed. To demonstrate this, consider the following example.
Async Write File C# - A Complete Example
using System;
using System.IO;
using System.Threading.Tasks;
using System.Text;

namespace FileIO
{
    class Program
    {
        static void Main(string[] args)
        {
            string dirPath = Environment.GetFolderPath(Environment.SpecialFolder.Desktop);
            string fileName = "AsyncWriteFile.txt";

            string longString = BuildLongString("Learn C# at wellsb.com");

            Task asyncTask = WriteFileAsync(dirPath, fileName, longString);

            //execute some code while file is written
            ExecuteSynchronousCode();

            Console.ReadLine();
        }

        static async Task WriteFileAsync(string dir, string file, string content)
        {
            Console.WriteLine("Async Write File has started.");
            using(StreamWriter outputFile = new StreamWriter(Path.Combine(dir, file)) )
            {
                await outputFile.WriteAsync(content);
            }
            Console.WriteLine("Async Write File has completed.");
        }

        static string BuildLongString(string content)
        {
            StringBuilder myStringBuilder = new StringBuilder("1. " + content);
            for (int i = 2; i < 1000; i++)
            {
                myStringBuilder.Append($"\r\n{i}. {content}");
            }
            return myStringBuilder.ToString();
        }

        static void ExecuteSynchronousCode()
        {
            Console.WriteLine();
            Console.WriteLine("Executing some code while Async task runs...");
            Console.WriteLine();
        }
    }
}
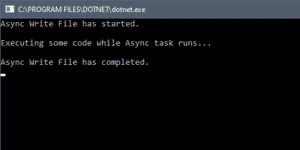
In this example, I have asynchronously written 999 lines to a text file. To verify that the file was written to asynchronously, I wrote another method which will print a line (Executing some code while Async task runs...) to the console. In a traditional synchronous application, the file write operation would block execution of code, so this line would appear after the file write operation is complete.
If file write operation is done asynchronously, however, the method would be triggered before the async task completes. If this is the case, the would expect this line to be printed after the async task starts, but before it completes, as shown below. You can also verify this using the Visual Studio debugger.

The Bottom Line
In this tutorial, you learned how to write to a text file asynchronously using C# and the StreamWriter constructor. You previously learned how to write to a text file synchronously. Async calls are especially useful in applications where performance is important, such as in ASP.NET web applications. If this tutorial has helped you, let me know in the comments below!
Don't stop learning!
There is so much to discover about C#. That's why I am making my favorite tips and tricks available for free. Enter your email address below to become a better .NET developer.
Did you know?

Our beautiful, multi-column C# reference guides contain more than 150 tips and examples to make it even easier to write better code.
Get your cheat sheets