Test-driven development is a valuable development process, and unit testing is an important part of the process. In this tutorial, you will learn how to write unit tests for a Razor Pages project using the xUnit testing library.
Setting up the Web App
Start by creating a new solution with a Razor Pages web application project. Suppose the web app simply takes two numbers as user input, multiplies them together, and displays the result.
You could use a model for binding the inputs and performing the calculation.
public class CalcModel
{
    public int Value1 { get; set; }
    public int Value2 { get; set; }
    public int Result()
    {
        return Value1 * Value2;
    }
}
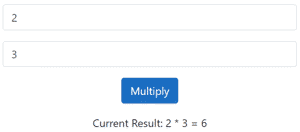
Your app's page design might look something like the following.
<div class="container">
    <div class="row mb-3">
        <div class="col-6 offset-lg-3">
            <form method="post">
                <input asp-for="CurrentResult.Value1" type="number" class="form-control mb-3" />
                <input asp-for="CurrentResult.Value2" type="number" class="form-control mb-3" />
                <div class="d-flex justify-content-around">
                    <button type="submit" asp-page-handler="MultiplyNumbers" class="btn btn-primary">Multiply</button>
                </div>
            </form>
        </div>
    </div>
    <div class="row">
        <div class="col-6 offset-lg-3">
            <p class="text-center">@($"Current Result: {Model.CurrentResult.Value1} * {Model.CurrentResult.Value2} = {Model.CurrentResult.Result()}")</p>
        </div>
    </div>
</div>
The form uses a POST method, so the button's submit handler should take the name OnPostMultiplyNumbers.
public class IndexModel : PageModel
{
    [BindProperty]
    public CalcModel CurrentResult{ get; set; }

    public IActionResult OnGet()
    {
        CurrentResult = new CalcModel();
        return Page();
    }

    public IActionResult OnPostMultiplyNumbers()
    {
        if (!ModelState.IsValid)
        {
            return BadRequest();
        }
        return Page();
    }
}
Here's how the form might look.

Unit Testing Razor Pages Project
In general, each unit test will consist of three components - Arrange, Act, and Assert. In the Arrange section, you will perform any required setup for the test scenario. In the Act section, execute the test to obtain some result. In the Assert section, verify that result you obtained matches the expected result.
Start by adding a new xUnit Test Project to the same solution as your Razor Pages project. Next, right click the xUnit Test project you just created and select Add > Project Reference. Select the razor pages project you previously created and click OK. Now you will be able to reference the project to be tested from your test project using a using directive.
For unit testing this project, you should break it down into smaller units. For example, you might want a test to ensure that the form's OnPost handler returns a BadRequest response when the model state is invalid. Similarly, you should perform a test to ensure a Page is returned when valid inputs are provided.
In your test project, create a new class called IndexPageTests and add the following. These two tests use the Fact keyword in xUnit to test the aforementioned scenarios.
public class IndexPageTests
{
    [Fact]
    public void OnPost_IfInvalidModel_ReturnBadRequest()
    {
        //arrange
        var pageModel = new IndexModel();

        //act
        pageModel.ModelState.AddModelError("Error", "Sample error description");
        var result = pageModel.OnPostMultiplyNumbers();

        //assert
        Assert.IsType<BadRequestResult>(result);
    }

    [Fact]
    public void OnPost_IfValidModel_ReturnPage()
    {
        //arrange
        var pageModel = new IndexModel();

        //act
        var result = pageModel.OnPostMultiplyNumbers();

        //assert
        Assert.IsType<PageResult>(result);
    }
}
Next, you might want a test to ensure the calculation performed in CalcModel returns the expected result. For this, create a new class called CalcModelTests. This time, we will use the Theory keyword and pass some inline data to the test method to ensure the correct result is obtained each time. The values provided to the InlineData attribute should correspond with the parameters expected by the test method. In the following example, they correspond to value1, value2, and expectedResult, respectively.
public class CalcModelTests
{
    [Theory]
    [InlineData(0, 1, 0)]
    [InlineData(1, 1, 1)]
    [InlineData(1, 2, 2)]
    public void OnValue1Value2_ReturnMultipliedResult(int value1, int value2, int expectedResult)
    {
        //act
        CalcModel calcModel = new CalcModel() { Value1 = value1, Value2 = value2 };

        //assert
        Assert.Equal(expectedResult, calcModel.Result());
    }
}
Running your Tests
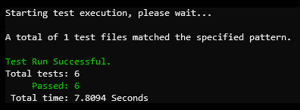
Running your tests is easy. In a terminal window, navigate to the directory of your test project and execute the following command.
dotnet test

Now, if you or somebody on your team make changes to your web app, you can re-run your tests to ensure that those changes did not break any of the app's core functionality. You should also add new tests for any new features you intend to implement. As you can imagine, this approach is more efficient than manually performing functional tests with every project release.
To see a slightly more advanced version of this project, check out the source code available on GitHub.
Did you know?

Our beautiful, multi-column C# reference guides contain more than 150 tips and examples to make it even easier to write better code.
Get your cheat sheets