SignalR is a library that simplifies the development of real-time web applications. It allows you to create hubs that can send and receive messages from any connected client, using various transports such as WebSockets, Server-Sent Events, or Long Polling. In this tutorial, you will learn how to use SignalR to create a simple chat application with C# and ASP.NET Core.
Getting Started
For this tutorial, I will be using Visual Studio 2022 with the ASP.NET and web development workload and the .NET 7 SDK. If you are using a different version of Visual Studio or .NET, you can still follow along, but some steps may be slightly different.
Create a web app project
First, create a web app project that will host your SignalR hub and your chat UI by following these steps:
- Open Visual Studio and select Create a new project
- In the Create a new project dialog, select ASP.NET Core Web App, and then select Next
- In the Configure your new project dialog, enter a name like SignalRChat for Project name. If you choose a different name, take note as you will also need to replace the corresponding namespaces in the code examples throughout this tutorial. Select Next
- In the Additional information dialog, select .NET 7.0 (Standard Term Support) and then select Create
Add the SignalR client library
The SignalR server library is included in the ASP.NET Core shared framework. The JavaScript client library isn't automatically included in the project. For this tutorial, use Library Manager (LibMan) to get the client library from unpkg.
- In Solution Explorer, right-click the project, and select Add > Client-Side Library
- In the Add Client-Side Library dialog:
- Select a provider like unpkg or jsdelivr for Provider
- Enter @microsoft/signalr@latest for Library
- Select Choose specific files, expand the dist/browser folder, and select signalr.min.js
- Set Target Location to wwwroot/js/signalr/
- Select Install
LibMan creates a wwwroot/js/signalr folder and copies the selected files to it.
Create a SignalR hub
A hub is a class that serves as a high-level pipeline that handles client-server communication. In the SignalRChat project folder, create a Hubs folder. In the Hubs folder, create the ChatHub class with the following code:
using Microsoft.AspNetCore.SignalR;

namespace SignalRChat.Hubs
{
	public class ChatHub : Hub
	{
	    public async Task SendMessage(string user, string message)
	    {
	        await Clients.All.SendAsync("ReceiveMessage", user, message);
	    }
    }
}
The ChatHub class inherits from the SignalR Hub class. The Hub class manages connections, groups, and messaging. Notice that SignalR code is asynchronous to provide maximum scalability.
The SendMessage method can be called by a connected client to send a message to all clients by using Clients.All.SendAsync(). You can also invoke a different method for the caller connection using Clients.Caller or for all connections execept that of the caller using Clients.Others. JavaScript client code, which includes a handler for the ReceiveMessage event and the code that calls the SendMessage method, is shown later in the tutorial.
Configure SignalR
The SignalR server must be configured to pass SignalR requests to SignalR. To do that, you need to add some startup code to your project.
- In Solution Explorer, open Program.cs
- Add the SignalR service to the dependency injection container:
builder.Services.AddSignalR();
- Add the following code after
app.UseRouting()to map requests to /chatHub to your ChatHub class.
app.UseEndpoints(endpoints =>
{
	endpoints.MapHub<ChatHub>("/chatHub");
});
Add SignalR client code
Now that you have set up your server-side code, you need to add some client-side code that will connect to your hub and send and receive messages.
- In Solution Explorer, expand the wwwroot/css directory.
- Open site.css. If the file doesn't exist, create it.
- Add the following code to site.css to add some basic styling for your chat UI:
.container {
	background-color: #99CCFF;
	border: thick solid #808080;
	padding: 20px;
	margin: 20px;
}
- Open Pages/Index.cshtml
- Replace the default code with this code:
<h1>SignalR Chat</h1>
<p>Type your name and message and press enter to send.</p>
<input type="text" id="userInput" placeholder="User name" />
<input type="text" id="messageInput" placeholder="Message" />
<ul id="messagesList"></ul>

<!-- Reference the SignalR library -->
<script src="https://cdnjs.cloudflare.com/ajax/libs/microsoft-signalr/5.0.11/signalr.min.js"></script>

<!-- Add SignalR script to update the chat message list -->
<script>
    // Create a connection to the chat hub
    var connection = new signalR.HubConnectionBuilder().withUrl("/chatHub").build();

    // Disable the send button until the connection is established
    document.getElementById("messageInput").disabled = true;

    // Define a function to display messages on the page
    function writeMessage(message) {
        var li = document.createElement("li");
        li.textContent = message;
        document.getElementById("messagesList").appendChild(li);
    }

    // Register a handler for the ReceiveMessage event from the hub
    connection.on("ReceiveMessage", function (user, message) {
        writeMessage(user + ": " + message);
    });

    // Start the connection and enable the send button when it's done
    connection.start().then(function () {
        document.getElementById("messageInput").disabled = false;
    }).catch(function (err) {
        return console.error(err.toString());
    });

    // Add an event listener for the send button
    document.getElementById("messageInput").addEventListener("keyup", function (event) {
        // Check if the enter key was pressed
        if (event.keyCode === 13) {
            // Get the user name and message from the input fields
            var user = document.getElementById("userInput").value;
            var message = document.getElementById("messageInput").value;

            // Call the SendMessage method on the hub
            connection.invoke("SendMessage", user, message).catch(function (err) {
                return console.error(err.toString());
            });

            // Clear the message input field
            document.getElementById("messageInput").value = "";
        }
    });
</script>
This code creates a simple HTML page that allows users to enter their name and message and send it to all connected clients. It also references the SignalR library and adds a script that connects to your ChatHub class and registers a handler for the ReceiveMessage event. The script also calls the SendMessage method on the hub when the user presses enter.
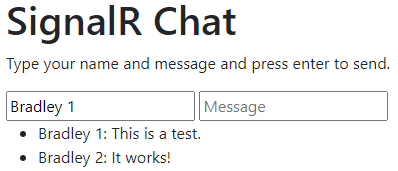
Test your app
Now that you have completed your SignalR chat app, you can test it by running it in your browser.
- Press Ctrl+F5 to run your app without debugging.
- Open another browser window or tab and navigate to your app's URL (for example, http://localhost:5000).
- In each window, type a name and a message and press enter. You should see the messages appear in both windows in real time.
Congratulations! You have created a real-time chat app using SignalR. You have learned how to create a SignalR hub class, configure SignalR services and endpoints, add SignalR client code, and send and receive messages between clients and servers.
Next steps
You have completed this tutorial on how to use SignalR for real-time communication between clients and servers. If you want to learn more about SignalR, you can check out these resources:
Don't stop learning!
There is so much to discover about C#. That's why I am making my favorite tips and tricks available for free. Enter your email address below to become a better .NET developer.
Did you know?

Our beautiful, multi-column C# reference guides contain more than 150 tips and examples to make it even easier to write better code.
Get your cheat sheets