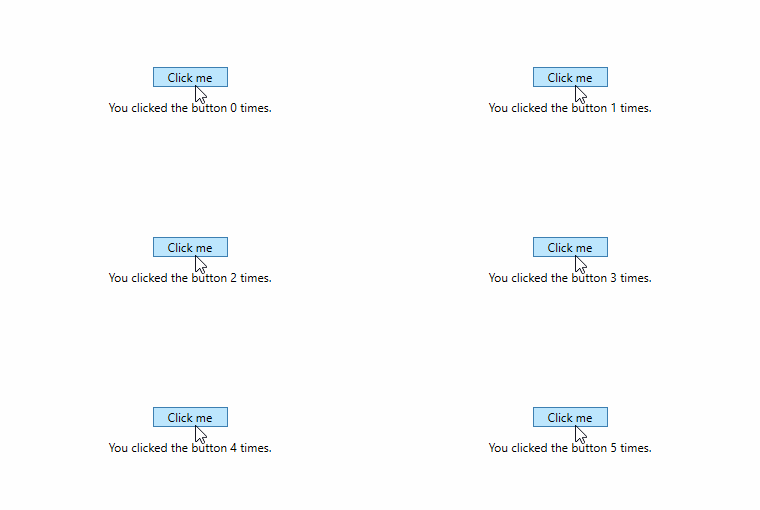
Learn how to use the INotifyPropertyChanged interface to bind a UI control in your WPF application to a property in your C# code.
C# Data Binding
In the previous tutorial, you learned how to create an event handler and attach it to an event, such as the clicking of a button. For example, you learned how to use to use statusLabel.Content = "You clicked the button!"; to change the content of a label when the user clicks a button.
Suppose, you want your program to display a different string every time an event is triggered, such as a count of how many times a button has been clicked. First, you will need an event handler to increment the value of some counter variable in your code. Then, you will need to make sure the UI is repainted so the new value of the variable is properly displayed on the screen.
You may be tempted to create an event handler that resembles the following:
public int Counter;

private void Button_Click(object sender, RoutedEventArgs e)
{
    Counter++;
    countLabel.Content = $"You clicked the button {Counter} times.";
}
This code will work, and the application will update the label content with the new count each time the button is clicked, but it is not recommended practice. As your projects get more advanced, it is tedious (and resource intensive) to have to continually redefine the content of UI elements each time an event is raised.
Instead, it is better to bind the properties that are being changed directly to the UI controls, so the front-facing user interface will automatically adjust to back-end changes that are made to the value of the property. This is called data binding, and it is an important component of UI application development.
WPF Binding with XAML
Starting with a new WPF application, create a user interface with a single button and a label by modifying the MainWindow.xaml file.
<Grid>
    <Button x:Name="myButton" Content="Click me" HorizontalAlignment="Center" Margin="0,0,0,0" VerticalAlignment="Center" Width="75" Click="Button_Click"/>
    <Label x:Name="counterLabel" Content="{Binding Counter}" Margin="0,60,0,0" HorizontalAlignment="Center" VerticalAlignment="Center"/>
</Grid>
Your Label’s Content attribute should look like the following: Content="{Binding Counter}". This will bind the content of this label control (with name counterLabel ) to to some C# property named Counter.
For the binding to work, you need to, first, define the Counter property and, second, configure the program to notify the UI when the value of the property changes. Start by creating a class which contains a public property called Counter.
public class CountModel
{
    private int _counter;

    public int Counter
    {
        get { return _counter; }
        set
        {
            _counter = value;
        }
    }
}
In this class, we have defined a private _counter integer and a public Counter property. Remember, C# is a case-sensitive language, so the label defined in MainWindow.xaml is bound to the public property Counter. It is exposed and accessed using get and set accessors. The private fields simply hold the values for the public properties.
Implementing INotifyPropertyChanged
Now that you have defined the Counter property, you need to notify the UI that the property has been changed. To do this, your class will need to implement the INotifyPropertyChanged interface. Change Line 31 to:
public class CountModel : INotifyPropertyChanged
INotifyPropertyChanged is found in the System.ComponentModel namespace, so you will need to add the namespace via a using directive.
using System.ComponentModel;
Recall when you learned about delegates that delegates can be used in event handling to pass values to the UI thread. To implement the INotifyPropertyChanged interface, you must register the PropertyChangedEventHandler delegate as an event.
public event PropertyChangedEventHandler PropertyChanged;
Finally, create a method called OnPropertyChanged() that will trigger each time the value of Counter is changed.
public class CountModel : INotifyPropertyChanged //using System.ComponentModel;
{
    private int _counter;

    public int Counter
    {
        get { return _counter; }
        set
        {
            _counter = value;
            OnPropertyChanged(nameof(Counter));
        }
    }

    public event PropertyChangedEventHandler PropertyChanged;

    protected void OnPropertyChanged(string propertyName)
    {

    }
}
By invoking the OnPropertyChanged() method within the set accessor, you have ensured that the event will be raised each time the property is changed. The OnPropertyChanged() method should receive as a parameter the name of the property that is being changed. This should correspond to the name of the property that was bound to the UI control {Binding Counter}. Line 41 is equivalent to OnPropertyChanged("Counter");.
Finally, write the OnPropertyChanged() method. When the PropertyChanged event is raised, this method will instantiate an object containing the name of the property that was changed so the UI control can connect to the appropriate property.
protected void OnPropertyChanged(string propertyName)
{
    if (PropertyChanged != null)
    {
        PropertyChanged(this, new PropertyChangedEventArgs(propertyName));
    }
}
Now, the program will listen for changes to the Counter property, and the UI will automatically update to reflect those changes when they occur.
Improving the Code
To reduce the possibility of typos when invoking the OnPropertyChanged() method, you may benefit from using the CallerMemberName class of the System.Runtime.CompilerServices namespace. In this case, you can invoke OnPropertyChanged() without passing any attributes. Simply change the method definition as follows.
protected void OnPropertyChanged([CallerMemberName] string propertyName = "")
Note, you will need to add a using System.Runtime.CompilerServices; directive and define a default value for the propertyName parameter in order to use CallerMemberName.
You can simplify the OnPropertyChanged() method by replacing the if not null condition with a null-conditional member access operator ?., also known as an Elvis operator. The ?. operator invokes the delegate once it ensures that the delegate is not null.
protected void OnPropertyChanged([CallerMemberName] string propertyName = "")
{
    PropertyChanged?.Invoke(this, new PropertyChangedEventArgs(propertyName));
}
Final Bits
Finally, create an instance of the CountModel object within public partial class MainWindow but outside any subclasses. You will use the name of this object to set the DataContext attribute of the counterLabel from the XAML file.
public partial class MainWindow : Window
{
    CountModel countModel = new CountModel();
    public MainWindow()
    {
        InitializeComponent();
        counterLabel.DataContext = countModel;
    }
...
Following is what your completed code should resemble:
using System;
using System.Collections.Generic;
using System.ComponentModel;
using System.Runtime.CompilerServices;
using System.Windows;

namespace DataBinding
{
    public partial class MainWindow : Window
    {
        CountModel countModel = new CountModel();
        public MainWindow()
        {
            InitializeComponent();
            counterLabel.DataContext = countModel;
        }

        public class CountModel : INotifyPropertyChanged
        {
            private int _counter;

            public int Counter
            {
                get { return _counter; }
                set
                {
                    _counter = value;
                    OnPropertyChanged();
                }
            }

            public event PropertyChangedEventHandler PropertyChanged;

            protected void OnPropertyChanged([CallerMemberName] string propertyName = "")
            {
                PropertyChanged?.Invoke(this, new PropertyChangedEventArgs(propertyName));
            }
        }

        private void Button_Click(object sender, RoutedEventArgs e)
        {
            countModel.Counter++;
        }
    }
}
Formatting UI Controls
Right now, the app is fairly uninteresting. The label shows a number and increments the number each time the button is clicked. Fortunately, there is a way to bind the UI control to the changing counter property and then format the string the label displays.
<Label x:Name="counterLabel" Content="{Binding Counter}" ContentStringFormat="You clicked the button {0} times." Margin="0,60,0,0" HorizontalAlignment="Center" VerticalAlignment="Center"/>
Now, the label displays a formatted string that contains a counter which automatically responds to changes to a C# property. The property is incremented each time the button click event is raised. When the property change event is raised, the UI is notified and the label is updated.

You can use the ContentStringFormat attribute in the same way you might use composite formatting for a C# string. In the example above, you created a formatted string that substitutes the bound parameter at the desired location {0}. It can also be used to format a variable to display as a currency {0:C} or as a number with a designated number of decimal points {0:N2}.
If you use a TextBlock instead of a Label, you will use StringFormat instead of ContentStringFormat. Following is an example:
<TextBlock x:Name="counterTextBlock" Text="{Binding Counter, StringFormat='You clicked the button {0} times.'}" Margin="0,120,0,0" HorizontalAlignment="Center" VerticalAlignment="Center"/>
The Bottom Line
Correctly binding front-end view control elements to variables and properties in the back-end model is an important part of C# application development. The examples in this tutorial follow the MVVM pattern for WPF application development, but the principles are similar to the MVC model for ASP.NET web development. In this tutorial, you were introduced to the concept of binding data in C#. You learned how to bind a XAML element to a C# class property, and you learned how to format the resulting string to display in your app. The comments are open for any questions you may have.
Don't stop learning!
There is so much to discover about C#. That's why I am making my favorite tips and tricks available for free. Enter your email address below to become a better .NET developer.
Did you know?

Our beautiful, multi-column C# reference guides contain more than 150 tips and examples to make it even easier to write better code.
Get your cheat sheets