Did you know you can use C# and .NET to extend the functionality of your Arduino device? In this tutorial, we will be writing a WPF desktop application to communicate with an Arduino Uno board connected through a USB port to your computer.
Getting Started
For this tutorial, you will need an Arduino board and the Arduino IDE. Connect the Arduino to your computer via USB port and take note of the COM port it is connected through. We will be using Visual Studio to write a WPF application that will interface with the Arduino. For communication between the Arduino and our C# program, we will use the serial COM port.
Program the Arduino
For this application, we will toggle the on-board LED based on values received through the serial port. The Arduino sketch will continuously read from the serial port, listening for input from the computer loop. It will then toggle the LED based on the value of the data received.
Open up the Arduino IDE and create a new sketch that looks like the following. On the Arduino Uno, the built-in LED is tied to port 13.
int ledPin = 13; //integrated LED
int serialData;

void setup() {
  Serial.begin(9600);  //initialize serial comms
  pinMode(ledPin, OUTPUT);
}

void loop() {
  if (Serial.available()) {
    serialData = Serial.read();
    if(serialData == '1'){
      digitalWrite(ledPin, HIGH);
    }
    else {
      digitalWrite(ledPin, LOW);
    }
  }
}
When the Arduino microcontroller reads a value of 1 in the incoming serial buffer, it will drive the LED pin high and, thus, turn the LED on. Any other character will turn the LED off.
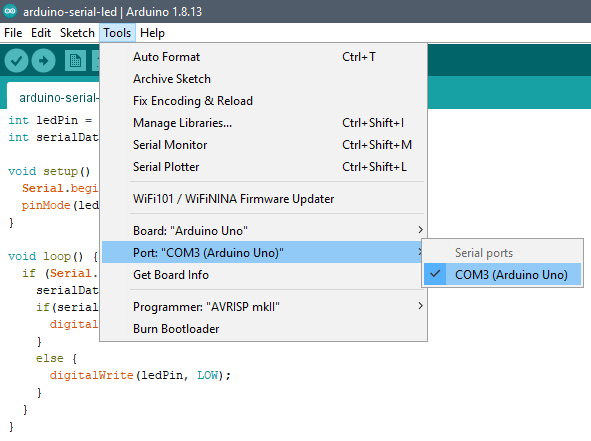
Be sure the correct Com port is selected and then compile and upload the sketch to your device. My device is connected via COM3.
Configure WPF Application
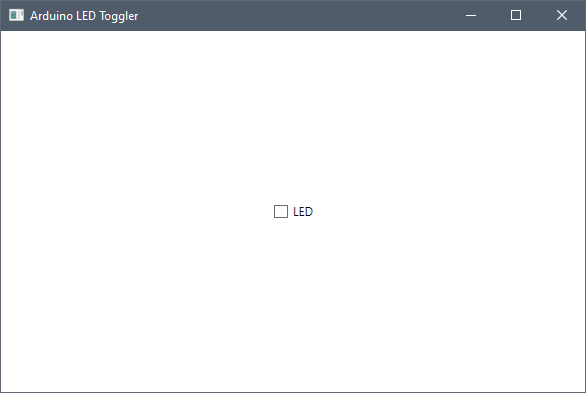
Now, launch Visual Studio and create a new WPF project. For the purposes of this tutorial, I added a simple CheckBox element from the ToolBox in MainWindow.xaml.
<Window x:Class="ArduinoSerialLed.MainWindow"
        xmlns="http://schemas.microsoft.com/winfx/2006/xaml/presentation"
        xmlns:x="http://schemas.microsoft.com/winfx/2006/xaml"
        xmlns:d="http://schemas.microsoft.com/expression/blend/2008"
        xmlns:mc="http://schemas.openxmlformats.org/markup-compatibility/2006"
        xmlns:local="clr-namespace:ArduinoSerialLed"
        mc:Ignorable="d"
        Closing="Window_Closing"
        Title="Arduino LED Toggler" Height="400" Width="600">
    <Grid>
        <CheckBox x:Name="ledCheckBox" Content="LED" HorizontalAlignment="Center" VerticalAlignment="Center"
                  Checked="ledCheckBox_Checked" Unchecked="ledCheckBox_Unchecked" />
    </Grid>
</Window>
You will notice a few event handlers we need to define (Window_Closing, ledCheckBox_Checked, and ledCheckBox_Unchecked). We will get to that in a bit. First, open MainWindow.xaml.cs and configure our serial port. If you don't have it installed, you will need to install and include the System.IO.Ports namespace. Again, my device is connected on COM3, so you may need to change the highlighted line in your code.
using System.IO.Ports;
static SerialPort _serialPort;

public MainWindow()
{
    InitializeComponent();
    _serialPort = new SerialPort("COM3", 9600);
    _serialPort.Open();
}
Recall that the Arduino is listening for a 1 in order to turn the integrated LED on. Our ledCheckBox_Checked handler, then, should write a value of 1 to the serial port when the checkbox is checked. To keep things consistent, we will write a 0 when the box is unchecked.
private void ledCheckBox_Checked(object sender, RoutedEventArgs e)
{
    _serialPort.Write("1");
}

private void ledCheckBox_Unchecked(object sender, RoutedEventArgs e)
{
    _serialPort.Write("0");
}
Finally, for this application, we can leave the serial port open until the window is closed. Configure the Window_Closing event handler to close the serial port when the window is closing. If your requirements are different, feel free to make the necessary adjustments.
private void Window_Closing(object sender, System.ComponentModel.CancelEventArgs e)
{
    _serialPort.Close();
}
Level Up
To improve this application, consider adding the ability to select the appropriate COM port from the desktop app's user interface using a ComboBox dropdown. You could also add error handling or serial read/write timeout limits. Finally, consider setting the initial value of the checkbox to match the current state of the LED.
The Bottom Line
In this tutorial, you learned how to communicate with an Arduino microcontroller using C# through a .NET desktop application. Serial communication in this example is from the computer to the Arduino, but it could easily go the other way. Consider a scenario where your Arduino is reading data from a sensor and you want your desktop application to be notified when a certain condition is met. In this case, you will be writing serial data out from the Arduino and reading the data from your desktop, console, or web server application.
Don't stop learning!
There is so much to discover about C#. That's why I am making my favorite tips and tricks available for free. Enter your email address below to become a better .NET developer.
Did you know?

Our beautiful, multi-column C# reference guides contain more than 150 tips and examples to make it even easier to write better code.
Get your cheat sheets